WELCOME

Hello! I'm Suzannah, a home design lover and mom of two, with one more on the way in January 2027. Follow along with my DIY fixer upper house renovations, design tips, occasional sewing and crafty projects, and de-stressing goals.

I show you how to create a beautiful home that still works with kids!

Subscribe to the blog below and join me on Substack here!
gardening
Showing posts with label gardening. Show all posts

7.21.2026

Backyard transformation over the past few years, nice enough for our wedding!

Because this house was such a fixer-upper and needed so many big projects to essentials like bathrooms and the roof, it took me a while to get to the yard. I’m also not a gardener, or at least I haven’t been so far in my life, so aside from grass versus pavers, I wasn’t sure what to do in our backyard for a long time.

But over the past couple years, I’ve made some very impactful changes that have made this backyard a wonderful place, so much so that we just got married here!

No comments

9.20.2021

Harvest time ends! How to start a vegetable garden: what worked, what didn't

After the success of our first big garden last year, I wanted to share more about ours this year. I’ve been posting updates throughout the spring and summer (garden plans, starting veggies from seed, planting the starts). But, things are different this year and we’ve had less time to put into it, and it has not been successful! But we’re at my favorite time of year for the garden, tomato season/late summer harvest. It’ll be wrapping up pretty soon so I figured I would share kind of a final update.

End of season harvest


I also love the zucchini and cucumbers that we’ve had, still have a few of those coming up. We only have one plant of each and they have both been super productive and giving us plenty of good ones! I could eat zucchini like every day so actually maybe we should do two plants of those next year, and not much else! It is a really easy one to grow and harvest.
Zucchini plant in the center, bolted lettuce and kale to the left

Something that did not go well: We did not harvest any of our lettuce because we just didn’t have our act together in time early summer (even though it's so easy), so we let it go to seed and might gather those and plant next year. But given our record with garden maintenance this year, I’m not sure that will happen. We did harvest some kale and then it grew some more, which we still haven’t harvested. We also didn't harvest the peas, which just dried up. What a waste.

The middle part of the garden is bare, this was the second year for these strawberries and I guess they just dry up after the second time.

We also grew several tomatillo plants because we have made some delicious tomatillo salsa and frozen some of it the past couple years. Takes all day, roasting them and then cooking and then preserving, but it’s amazing. But this year, combination of the intense heat that we had a couple times, and probably not consistent enough watering… They basically aren’t good. They’re dropping off the plants before turning green and they smelled bad.

Something that went well: We planted several cherry tomatoes and a couple heirloom tomato plants. They are all producing a ton! I think we need bigger tomato cages next year, though. We do have one big cherry tomato in a big pot and it’s done even better. Got taller, and had a taller cage. And it’s easier to harvest them in a raised planter like that. All of them taste SO GOOD. Storebought tomatoes are a disgrace in comparison! 
Picking heirloom tomatoes in a Target sand bucket. Why not

I heard a podcast the other day on tips for quieting your mind and busy-ness of being a parent of young kids, and one was to give yourself permission not to do everything right now. The host's example was vegetable gardening. She loves the idea, but she doesn't have the time to water and harvest in this time of life, and it's okay to not do something all the time/every year. That spoke to me. Tempted to garden less next year, unfortunately. 

We’re considering turning the L-shaped garden by the fence into lawn for next year and then getting some really large planters or raised beds on the chip area by the back of the fence, it gets plenty of sun. Just shrinking the garden area. And will still do the tomatoes in the sunny spot by the garage.

So that's the update. If you're interested in vegetable gardening, do check out my posts for how we got to this point (garden plans, starting veggies from seed, planting the starts) and I wish you luck!
No comments

6.30.2021

Vegetable garden update: planting starts

I’m really excited about the garden that we had last year and we're doing this year, and I was hoping to share updates once a month or so in the spring and summer documenting what we’ve done. It will help me in the future if nothing else! I haven’t gotten to do an update in a while though, so we’ll have to skip ahead from where we left off, where our veggie starts were growing from seed. 

No comments

4.12.2021

The beginnings of our garden this year: starting vegetables from seeds!

We've dabbled with vegetable gardening for many years but last year we had our first real garden, with a huge variety of plants and a lot of dedicated space in our yard. I had almost nothing to do with it; Jason did it all himself with advice and help from his mom, but I was totally convinced by the end of the summer after having plenty of vegetables to harvest every day.

We did almost everything from starts last year, which is a bit more expensive but we thought would also be a safer bet. This year we're starting from seeds and we're so excited with how well it's going so far!

No comments

3.02.2021

Our successful vegetable gardening experience and plans for this year

Last summer we did our first large vegetable garden and it was a huge success! Jason’s sharing how he started our garden from scratch, what he did to prepare the soil, his tips for seeds and starts, and what we learned and will do differently this year.

No comments

1.01.2021

2021 house project goals!!

We're feeling so good about our progress on this house (the Stanley Tudor - Revived)! We're in a great spot where we don't have ANY rooms that need to be completely redone (as long as you don't count the basement or garage). We have some updating to do and some rooms to finish, and plenty more on the exterior, but we don't have any more bathroom renos on the horizon. Phew!

I shared our 2020 house project progress here and you can see the almost-current state of our house here. Here's the list for 2021!

Here's the part where I share sort of embarrassing current-state "before" photos taken on a random day in late December, when I didn't put away or clean up anything. Plus, Oregon in the middle of winter is not pretty outside. But here goes.

2021 Historic Tudor Revival Home DIY Project Goals


I'll break this out into exterior and interior. I won't put maintenance/improved maintenance (like giving the hedges a better trim) or minor updates (like finding the perfect art piece for a tricky spot) on this list. Instead, this is the stuff that will take a weekend or two to do, plus more time beforehand for planning.

Exterior Projects


1. Finish the path in the backyard. We started on this but never finished so we have two depressions (tripping hazards as well as not pretty) and Jason wants to pour some big custom concrete pavers for the triangle-shaped area. 

No comments

12.28.2020

2020 home project recap!

I have to say our major accomplishments of this year have been 1) we had a baby and 2) Jason graduated from physical therapy school. But those are just top of mind...! Looking back, we did a ton of other important things to our home, too. 

I also can compare our actual progress to our 2020 house goals list... we did pretty well!, but we shifted focus partway through the year when we thought more seriously about the logistics of adding another baby to our family. So we did things that we didn't think we'd get to this year!


2020 home improvement project progress

Going in order of the 2020 house goals list... here's how we did! (You can also read our 2019 projects and 2019 progress for this house. We've come a long way!)


1. Roof

Done! It was expensive, about $18k like we expected, plus $1,500 or so for replacement gutters and new gutters on the gazebo and part of the garage. We had these parts of our exterior done first, back in February. Most houses wouldn't be this expensive in this area, but ours is steep and had three layers of old roofing to demo first. Here's my post all about the roof replacement.

No comments

4.27.2020

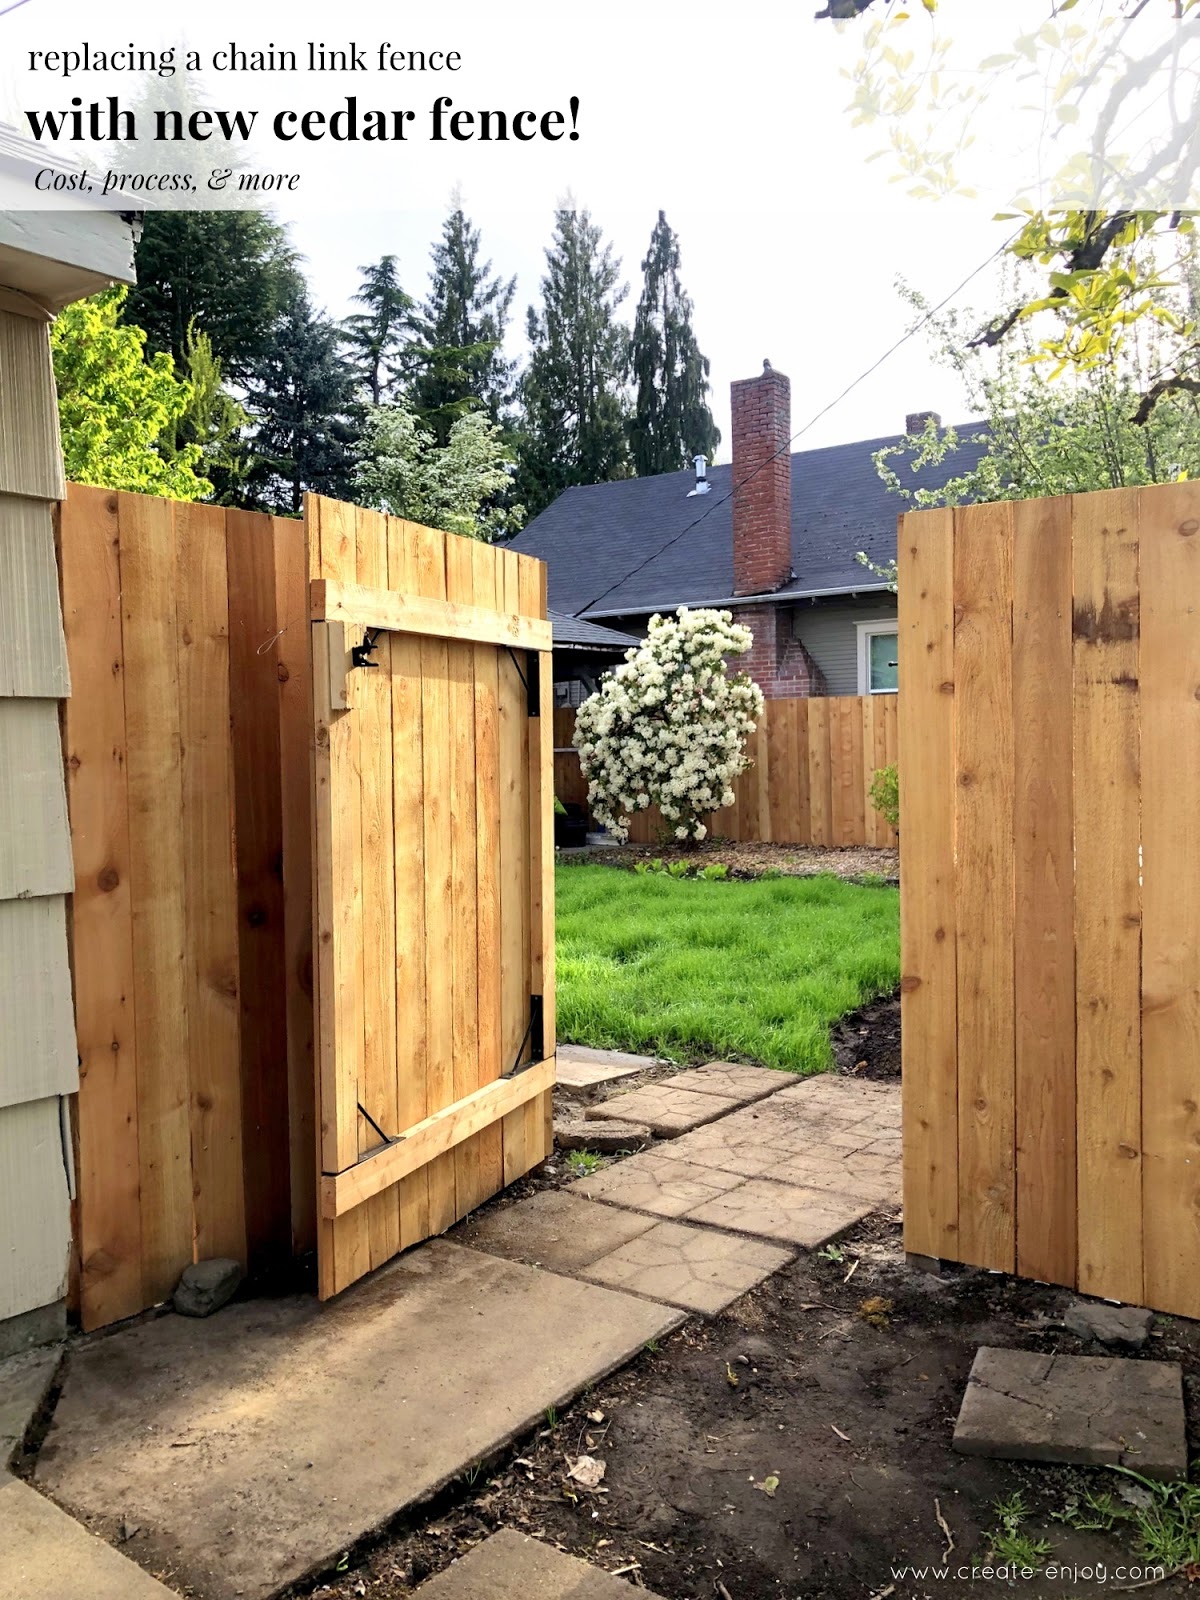
Replacing our fence! All the photos, cost, process, and more!

We recently made a HUGE and really satisfying update to our backyard!! We replaced our entire fence (three sides of slatted chain link, plus a cedar gate area) and immediately love our yard so much more! Sharing all about the project here!


No comments

3.24.2020

Pro tips on indoor gardening!

Curious about seed starting or indoor gardening in general?

On this week's episode of the Your Home Story Podcast, we have Tracey from @thefakefarmgirl explaining exactly how to get good germination, what type of light works for seed starting, and what plants are the easiest to grow.

Specifically, we covered:
  1. All types of seed starting supplies including: trays with covers, lights, and growing mat.
  2. The key to knowing when to transplant is knowing your growing zone.
  3. Rosemary and lavender are easier herbs to grow indoors.
  4. If you want a good laugh, check out the “Matter Baby” highlight in Tracey’s IG.
  5. Get a walk-through of exactly what Tracey does and a look at her setup in her “Seed” stories on IG.

You can find us on our blogs or connect with me, Ashley, and the podcast on Instagram:
@suzannahstanley
@biggerthanthethreeofus
@yourhomestorypodcast

And you can join our Facebook group here to connect with other listeners and ask questions!
Listen here or in your podcast player!
No comments

9.05.2017

Exterior cleanup and "landscaping" at the Stanley 90's Reno

Until I shared our exterior painting update last week, I'd shared almost no photos of the exterior of our fixer upper cause everything about it was so depressing. The paint colors, the abandoned garden in one corner, the damaged fence, the thistles and scrubby, muddy patches of grass here and there among the moss... a yard was one of the main things we wanted when we bought this house, but ours was not quite usable and enjoyable to be in for quite a while!

So, with a little over $100 of materials and really not that many hours of work, we've got it looking MUCH better and we're almost proud of it and want to be out in it!

No comments

7.21.2015

Beginning gardening, plus tech! The Edyn garden sensor

I'm an aspiring gardener. Not a very experienced one, nor one with a lot of resources (like a yard of any kind)... but, I do what I can!

This summer our little porch garden contains 6 tomato plants, several varieties of herbs, and a ton of onions. We've done peppers, lettuce, and even cucumbers in the past, but this year we stuck to a smaller selection and just got more of them.

So when I got a chance to try out an Edyn Garden Sensor, I thought we could really learn something from watching data about our plants' health!

The Edyn Garden Sensor was born of a Kickstarter campaign in summer 2014. It's a solar-powered sensor that gathers and analyzes data about light, humidity, temperature, soil nutrition, and moisture around it and wirelessly connects to the Edyn cloud; checks the data with plant, soil science, and weather databases; and feeds the info to your iPhone. Fancy stuff!!

It's available on the Edyn website and at HomeDepot.com and select Home Depot stores.

The data from the sensor tells us the current environmental conditions of the plant in question (this one is Tomato) which is probably the most helpful part for us.

It also provides historical data about the plant's health over time. You also can track multiple sensors at once, so you can watch the health of a variety of plants in the same conditions. And the app has options for tons of different plants so you can learn about their growth stages, tailored to-do's, and how well they fit with your garden. (In future phases of the app, there will be a garden timeline with suggestions for when to harvest, plus ideas for plant groupings that go well together.)

We have definitely under- and over-watered plants before... as beginning gardeners it's sometimes hard to get into the routine of caring for our plants, especially when that routine changes a lot with the weather from April to October in Oregon. Sometimes the rain waters the plants for us; others we have to water twice a day!

Husband has enjoyed the tech + hands-on elements of the sensor and the garden is more his creation than mine. He has more gardening experience than I do and is more diligent about watering than I am!

So here's his review about the sensor!
  • It's sturdy. The specs state how it's built for the elements, but it really does feel like it'll last through many seasons of use.
  • It's easy to use. It was super fun and easy to set up and connect to a smart phone.
  • It's not buggy. It consistently has worked and been accurate.
  • It covers a lot. One sensor covers 250' of soil! We're using small containers, which is potentially not as useful since it can only cover one plant, but it's still helpful for the size and type of plant it's in. The downside is, if you have plants in differently sized pots or of different varieties, it's less helpful. The tool would be best used for a garden box or in-ground garden so it could cover a wider area. However, the plant with the sensor in it is by far doing the best of all our plants! (It's in the largest pot, in the sunniest spot, but the sensor has been helping us keep it healthy.)

I'm really excited to have this tool to help us track our garden's health, as we learn gardening skills and slowly add to our plant repertoire!

Follow along as Edyn grows (pun not intended) and #gardensmart!

Twitter: @EdynGarden
Instagram: @edyn_garden
Purchase on the Edyn website and at HomeDepot.com and select Home Depot stores.

Thanks to Edyn for sending me the sensor and sponsoring this post!

No comments

12.01.2014

A festive natural greenery holiday party, DIYs, and Paleo-friendly recipes!

I love this season!
We're having a holiday party this year, and a few dinner parties with friends, and I got to practicing with this festive natural greenery themed shoot with friends the other weekend. My good friend Jenni and I worked with Orchard Supply Hardware to put together a Christmas party shoot with plenty of greenery, natural, live decor pieces, and some simple DIYs. Orchard Supply Hardware has recently opened a couple stores in Oregon (they have close to 90 in California) and they were so nice to work with and a great hardware/yard supply shopping experience! Check them out!

Jenni runs A Well Crafted Party and does a ton of seasonal and party projects. Her vision and skills combined with my house and recipes made for a very pretty party! Our friend Macey of Motormouth Studios shot the photos for us (on an appropriately very dark and rainy day). Jenni will be posting about the party too, and her DIYs - check out her first post here!

Natural greenery holiday party, DIYs, and Paleo-friendly recipes!


Welcome to my holiday home!

At the entryway we used a very cool stump Jenni had from a neighbor's tree as a side table, next to my recovered Louis chair and DIY fur throw.

We got the perfect mini tree from Orchard and decorated it with these simple Scandinavian straw ornaments we have--from this Scandinavian shop. The plaid fabric wrapped around the pot is from JoAnn.


One simple DIY we did was a copper spray paint branch with ribbons hanging from it to display holiday cards. I love putting them in a central location like this where you can see friends and family as you walk past all the time! Great for the party and beyond.

We decorated the table with natural greenery garlands, a rosemary tree, and appetizers!

I'm working on the recipe posts to share with you soon! Jenni did printables of the menus and signs, and you'll be able to find them here soon.

We wanted a simple, natural table and loved putting greenery down the center, wrapped around a rosemary tree. We focused on a lot of natural green, cranberries, and black/white. The coppery wine glasses are vintage and were my grandmother's. I don't use them much but they are pretty cool for occasions like this! Their edgy shape worked with the square chargers and straight-lined silverware.

You'll have to check out Jenni's brilliant DIY of these chargers. The beautiful, smooth wood is from Orchard and she finished them with polyurethane and a copper edge. She also spray painted and sealed the handles of the silverware! What a cool way to get a different color without spending a ton. Look for her tutorials here, should be posted soon!

The rosemary trees came in these beautiful clay pots from Orchard. Made it very easy to decorate with them! (And they smell soooooo good.)

How cool are the wood cookie name places/favors? Just a simple wood burning pen--you can get a simple one for $10 here, or this set with multiple tips.

Jenni also did the pretty menus and signs. You can find them in her printables soon!

An easy way to make a water pitcher more festive is to freeze some cranberries in ice cube trays and add them to the water!

Orchard provided us with greenery; a cute mini Christmas tree; the rosemary trees; the copper spray paint we used on the holiday card hanging branch, silverware handles, and candle holders; and the lovely wood for the chargers and the polyurethane and copper pens to finish them.

It was so fun celebrating the holiday season early!

Look forward to sharing my real food Paleo-friendly holiday party appetizers with you!

10 comments

7.29.2014

Pretty home books, and 5 tips for small space gardening

I love getting inspired for making my home comfortable and beautiful. The inside and outside of my home.

So I got a chance to review Kelly Edwards's new book, The Design Cookbook: Recipes for a Stylish Home. Kelly is great with decor tips for small spaces and budget-friendly decorating. She wanted to offer up summer decorating DIYs, budget tips, indoor/outdoor space ideas, and easy gardening suggestions. I thought, yes, I could seriously use some easy gardening ideas!

This is our "garden" this year. It's gotten a little out of hand, as you can see by the climbing cucumber on the patio chair.

We're growing a few more plants than last year, and some new ones (we got starters from a coworker's garden), and they're definitely bigger than the few tomatoes and lettuces we had last year.

Gardening is not my strong suit. So I thought some of Kelly's tips on summer gardening for small spaces would be great for me and any readers with porch gardens!

Here are my five questions for Kelly, plus some of my fave plant-related images from her new book!

1) Favorite projects for beginning gardeners? 
a. If you’ve never gardened before start small with herbs in terra cotta flowerpots. They are so easy to grow. Just add water and follow the directions on the sun exposure. Or...if you’re lucky and have a friend with a green thumb have him/her help you out and plant a few things. We had our gardener start tomato plants in our backyard. A few months later we had enough for the neighborhood! Also, when starting out plant things that are easy to grow. Think salad...lettuce, tomatoes, spring onions, cucumbers, and bell peppers. You can’t go wrong there. 

2) What tips do you have for small space gardens or porch gardens? 
a. If you live in a small space and your only outdoor area is a porch or balcony, a garden can still be possible. The only difference is that you need to think mobile or vertical. Planting a mobile garden keeps your garden close and accessible. My favorite is the Food Map Container. Made with food grade plastic, it’s a perfect vessel on wheels to have on a porch or balcony that makes it so easy to grow in small spaces. Another option is going vertical with your garden. If you have a blank wall on a patio or deck it can provide for a great place to plant the vegetables or plants of the season. You can purchase pockets that hang, trays that mimic the look like a garden wall, or planting towers online. 

3) What outdoor projects do you find have the biggest impact without blowing your budget? 
a. If you have a deck re-staining it should be a definite summer project. Completed in a weekend or two it can do wonders for your back yard! With so many colors to choose from, it can turn a dull, cracked, worn out deck into a gorgeous entertaining space. However, if your budget is smaller add patio and backyard lighting. I always preach that lighting can make or break a design indoors. The same goes for the outdoors. Hang sting lights, install garden lighting or invest in lanterns for extra illumination. At night your place will glow. It’s my number one suggestion when entertaining. Make the lighting right! Lastly, planting new flowers and plants. A small bit of landscaping can go a long way. 

4) What are your favorite resources for DIY supplies for outdoor projects? 
a. While I’m a sucker for all home improvement stores I’ve found that Home Depot is great for tools, lumber and general construction supplies. Lowes is great for lighting, plants and decorative materials. A mix of the two always works for me. 

5) Any suggestions for keeping the outdoor space looking attractive even after summer plants have come and gone? 
a. I love planting herbs: thyme, mint, rosemary, and basil. These are all good choices that constantly give you plenty of love. I especially like that when the spring and summer months are over, I can bring them in and they are the gifts that keep on giving. We cook with them every night. Also, change out the décor with the season. Adding some blankets to each of the chairs outdoors or a great fire pit in the fall will keep your space looking like it well designed even when you get into the colder months.

She makes it sound easy.

The Design Cookbook has 335 pages and more than 1,000 contributors. I recognized several of my favorite home tours and projects from around the blog world.

I also love that one of the first pages proudly displays this great William Morris quote: "Have nothing in your homes that you do not know to be useful, or believe to be beautiful."

Great message for happy home decor, and goes well with all the inspiring images!

Thanks for the garden tips, Kelly!

Check out The Design Cookbook for lots more home dec ideas and projects!

Waterpik partnered with Kelly Edwards to share her tips and book with bloggers like me. Thanks to them!
6 comments

6.12.2013

Our first garden, if you can call it that, and the front porch is decorated

I am not a gardener, I'm sad to say. My mom has always had tons of beautiful flowers on three sides of the house, and my parents-in-law grow about 30 kinds of vegetables and other crops on their large lot, so my husband and I both grew up around it--but I know very little about it and never had any desire to spend much time in the garden!

But, I do appreciate doing things myself (duh), and the grow-your-own-food movement is one I can get on board with at least in theory. So this year, we're settled into our new place and felt ready to try some actual gardening! (In our rental places, I grew some herbs on the windowsill, and we have a lemon tree in a huge pot that we've carried from place to place, but I never wanted to put the effort in to really garden.)

We have two decks but no yard, so we're sticking to container gardening for now. I had no idea how to go about even something that simple, but we've cobbled together quite a nice little vegetable crop using tips from this amazing book my coworker found, tips from my mother-in-law, and the backs of seed packets.

My coworker found the Timber Press Guide to Vegetable Gardening in the Pacific Northwest at Powell's and picked it up because it was so simple and clear to understand, so much better than so many of the confusing gardening books I've seen before. It goes month by month, what you need to do to your garden, specific to this climate. I read through April before I had to give it back to her. ;) But we got through the planting part!

We bought some awesome railing planter boxes and some potting soil and planted a bunch of seeds a couple months ago. The lettuces grew super fast and we've harvested from them already twice now! We also got some tomato starts, and they're doing pretty well in big pots of their own. This year's been much warmer than the last two so hopefully the tomatoes will be ripe before September like they were last year--ridiculous!

We've also got a few little aluminum pots with herbs and chili peppers in them. The round one on the table there is regrown celery from this tutorial! Whoa!

Oh, about the table... possibly the most exciting part of our porch right now is the table and chairs since they mean we'll be able to actually SIT on it and spend some time out there! All winter there was NOTHING on our porch at all. Nothing. Which was handy for me taking book photos out there with the open lighting, but not fun for enjoying as a porch.

Now that the weather's been amazing, we've wanted to eat outside (and have a few times), but it's a pain to haul chairs out there and not have a place to put the plate. ;) So literally just yesterday, we picked up this bistro set from Craigslist. I think it's a few years old from Ikea, but it works just fine for now. I've been shopping around a little for patio sets, but nothing has been perfect and the $50 used set from Craigslist is more my speed right now than finding the perfect thing, anyway.

The hot pink rug I picked up at Ikea several months ago because I looooved it... those colors! So it sat rolled up in the closet until the weather got better recently and I unwrapped it. Always exciting to find new things you've already bought. ;)

So happy with how our summery porch is coming along! Hoping for more crops and meals spent outdoors soon!

Would love to hear your tips for small spaces and porches, and container gardening! Have you found any crops that work well? Particularly for the horticulturally challenged, like me?!

16 comments

5.10.2013

The greatest little terrarium shop and my first attempt...

Terrarium shop?? That's what I said when my coworker told me about Artemisia after getting a terrarium gift certificate from there as a birthday gift... an entire store dedicated to terrariums and indoor gardening sounded amazing! And definitely like something we would have here in Portland.

Since moving into our house last year, I've decided to really try at this whole gardening thing--planters on the deck with veggies, and happy houseplants inside in pretty pots. But unfortunately, I know very little about gardening. Or terrariums. But I really like them! I love looking at succulents at the grocery store but don't know what to do with them.

Anyway, so I checked out Artemisia online and decided I just had to stop by, and it's right by my work. I thought their terrarium kits were the greatest idea, especially for people like me who are not terrarium gardening pros. ;) I also wanted to share their stuff with you readers! So I contacted Amy, Artemisia's owner, and she was happy to share a kit for me to review!

They also have an amazing online shop where you can order terrarium kits like the one I got, plus beautiful planters, their custom made hooks and altars, and all kinds of other stuff. I checked out the online shop a couple times before coming into the store on my lunch break recently. The store--O. M. G. So pretty. I took lots of pics so you can see the wonderland I got to look around in!


Here are some of the terrarium kits--these are easy to ship in the mail as gifts, or just to carry home and make wherever. Each kit has a different theme or feeling to it, so you can pick out a personalized little scene to create at home!


They also have kits for hanging terrariums. So pretty, and how cool are those iron hanging stands they have made for them?

They have a big selection of sands for creating your own terrariums, and Amy said people from all over come in or order them online because they're hard to find!

This is the workshop table... how incredible would it be to get to play around with all the sands, rocks, and other materials, just little bits of each? I have so much to learn about indoor gardening, would love to take a class in it! 

Turns out Amy also wrote this beautiful book, Terrarium Craft, which I've definitely seen before at Powell's or other book or garden/crafty stores. It's like a gorgeous cookbook for how to play with different types of plants and materials. So many ideas and so much I could learn from it!

So, I left the store with plenty of pretty images and ideas in my head, and this sweet little hanging terrarium kit in hand. Here's my review of making it!

Here's my medium hanging terrarium kit. This one came with an air plant, so Amy gave me some specific care instructions and I hope I can take care of it for a long, long time. (Turns out the spritz method is a no-no. Glad I asked!)

I loved this sand--it's made from recycled beer bottles. Such pretty colors!

Then I put in some pebbles, then the moss...

Then the purple moss, then my little air plant!

I wasn't sure what to hang it with, thought about string or ribbon, but for now I used this clear fishing line and a cup hook.

Hung the cup hook on the underside of the skinny window at the foot of our stairs, and doubled the fishing line, tied a knot on the end, and looped it through the teardrop eye.

It hangs happily near the front door and at the base of the stairs. What a pretty accessory, and so special and different from the other plants!

So, if you're inspired, check out the Artemisia online store, or the physical store if you're in Portland!, or check out Terrarium Craft. 

If you're a pro at this stuff, how about some advice? What should my next terrarium/succulent project be? Any great DIY terrarium ideas?!

10 comments

SUBSCRIBE BY EMAIL

Get new posts by email:

Search

​
© Create / Enjoy • Theme by Maira G.