WELCOME

Hello! I'm Suzannah, a serious DIYer and mom of two little ones. Follow along with my DIY fixer upper house renovations, sewing and crafty projects, real food recipes, and de-stressing goals.
I believe you can love your home just the way it is, AND have the power to design and make big changes to make it better.
I'm also the author of DIY Wardrobe Makeovers!

kitchen
Showing posts with label kitchen. Show all posts

8.20.2025

Timeless style updates to my plain all-white kitchen

I redid my kitchen in 2019, which was not that long ago, but I was still figuring out my style at the time and I chose some then trendy, more modern finishes I would not choose now. (I also was still very much in a fixer upper mindset, and the house had glass block tile and peeling wallpaper and three layers of old roof tiles and… point is, I just wanted something fresh and clean and new.) So I ended up with a very white, pretty boring kitchen.

But it feels wasteful to redo a new kitchen. I’m not about to replace tile countertops or cabinets, but I realized there were several things I could do that would add more character and interest. I also had some circa 2022/2021 “organic earthy modern” touches to undo! They had coordinated with the brushed brass and industrial wood shelves, but did not go with my clean, classic, Nancy Meyers-inspired, hopefully timeless kitchen look.

I did several small, budget-friendly projects to totally refresh this kitchen!

No comments

6.25.2025

Classic bracket open shelves in my historic house kitchen

I was really proud of these DIY industrial wood/bracket shelves when we redid our kitchen in 2019. I couldn’t find thick enough wood on its own so I use stair risers and cut off the rounded edges. They worked great function-wise, and when we first installed them, they added some nice warm because the kitchen was so plain and so white. But now… I’m really going for a more traditional, classic, and cohesive look here, and they were sticking out like a sore thumb. 

So... I replaced them with something better!!!

Thanks to Van Dyke's Restorers for partnering with me on this post.


No comments

6.15.2020

DIY kitchen reno 1-year anniversary: what we'd change, what we still love

 A year ago around now we were wrapping up our biggest, most expensive room project yet: a full kitchen renovation in our 1937 house, removing all of the 1980's and 2000's cabinets, lighting, flooring, etc. We lived here almost a year with the funky old kitchen (which had some function issues as well as aesthetics) and planned long and hard for this project.

We had a 14-month-old at the time but Jason had some time off school and we did ALL the work ourselves with the exception of installing the countertops. It was a lot!!!

We are SO glad we jumped into this big reno and have been enjoying our beautiful new kitchen for a year now! Thought it was time to look back and reflect on how it's held up, what we'd change, and what we love most.

This is also a bit of a "real life" kitchen tour--I didn't style the open shelves or move Otto's toddler step stool out of the way for all of these photos. I did clean, but this is pretty much how it looks most of the time and how we use it!

DIY kitchen after 1 year


Here she is--small but big enough, our galley-style kitchen. The footprint, doors, windows, and sink location are all original. 
No comments

3.04.2020

Our unique kitchen essentials!

I have been wanting to share these tips since pre-kitchen reno!! I've been into cooking since high school and over time I've developed a handful of what I consider essential tools and tricks for using a kitchen. Check out this list, these may be new to you!!

10 unique kitchen essentials


  1. A small nontoxic nonstick skillet. Nonstick pans get scratched up so easily! And when they do you're supposed to throw them out. We've gone through so many of the black ones, I recently upgraded to a ceramic one like this and it's just magical! Jason, Otto, and I each eat eggs in the morning at different times and this one is SO easy to wash in between. Basically nothing sticks to it (we use a little butter first) but anything that does pops off as soon as you put water on it when it's hot. Incredible! We only use rubber tools on it, no metal, but it has been holding up super well too and has no scratches.
  2. The only bag clips that work. You need the clamp-style ones! The clothespin-shaped ones only keep stuff from coming out; they don't keep air from coming in and most food gets stale faster than you can eat it! We have these colorful ones from IKEA but I found these tasteful grey/white ones. Put them on chip bags, cereal bags, frozen food, cut veggies... such a good upgrade!!
  3. Scissors in every drawer. Every drawer!! This is a rule I grew up with (my parents totally had the right idea!). Now we keep sturdy ones that can cut meat, Otto's food, etc. in three drawers and regular paper scissors in three others so there's always a pair handy when opening a package or cooking. We have enough that we can put them in the dishwasher when dirty and still be able to find some next time you need them. I don't know how people live without scissors around... I hate poorly torn plastic packaging, stuff spills out, you can't close the bag as easily again... life is chaos without tools like scissors.
  4. Non-ugly, non-broken cooking tools. Until very recently I had these neon colored, chipped rubber spatulas with warped wood handles and was still using them. Why?!!? We upgraded to a set like this and cooking has been so much more enjoyable!!
  5. Onion cutting board. If you've ever eaten cantaloupe that was cut on the same cutting board as onions and garlic, you know this problem. I'm very sensitive to smell and taste so I can always tell! Use a small, distinctive cutting board (I love acacia wood ones like this and these) and let everyone in the house know it's only for onions and garlic (or things they don't mind tasting like same). This is preferable to Sharpie-ing "ONION" on a cheap bamboo cutting board like I did for years.
  6. A pretty colander. Put it on your open shelves, in a corner on your counter, in a cabinet with glass doors... they're an essential piece of cooking equipment that can double as decor if you upgrade from a plastic one. This one comes in so many colors! (but you know I love white).
  7. The blender of all blenders. We got a Vitamix yeeears ago, a refurbished version of a basic model, and it's never failed us. I think we have 3 pitchers for it but we always just use the shorter plastic one. It's the perfect size for smoothies, blended buttery coffee, and even blended soups. I've made smoothies at other people's houses a few times since switching to one of these and let me tell you, other brands of blenders do not compare. They are nothing to the Vitamix. It's so powerful and fast at making perfectly blended smoothies!! I make this protein smoothie a lot and am thankful for the Vitamix every time. And the pitcher is so easy to clean, you can put soap and water in it and blend for a few seconds!
  8. Multi-size stretch lids. Plastic wrap is such a pain compared to these reusable, multi-size stretch lids. They're so great to put over bowls, drinking glasses, baking dishes, etc. and you just pop them in the dishwasher when done. A genius invention!! I've used the beeswax wrap too but I think these are much easier for standard round containers. 
  9. Upgraded dish brushes. We threw out our plastic IKEA dish brushes and switched to wood or bamboo handle ones and have never looked back. I don't want more plastic in my life in genera, but these sit out on the counter, for goodness' sake! We did a whole kitchen renovation, no way I'd want to put bright green plastic out the counter in such a pretty setting! But even pre-kitchen reno, I was converted. These brushes are beautiful and functional. Feels so fancy but it's not an upgrade in terms of cost, just design!
  10. Big crocks. We have three of these of different sizes in our kitchen and they are so great. We use them for 1) utensil crock-sized one for holding the dish brushes and steel wool, 2) compost/kitchen scraps, 3) thin film plastic recycling. We collect plastic produce bags, those blue/white Amazon bubble mailers, etc. in a bag inside a HUGE ceramic vase on the counter and I take them to Home Depot or Target or whatever when it gets full for recycling. If we had a big recycling cabinet we'd put them in a plastic trash can there, but we don't, so we keep a big, beautiful vase out all the time. I love to keep my counters clear but too clear is boring, so I love large, washable, functional storage like a ceramic crock here and there. Of course you can also put your new pretty wooden spoons/spatulas in one by the stove, or some kind of snack or packet that doesn't need to be enclosed. I encourage you to think of ways to store functional, less pretty things in beautiful ways like this! I linked some fave LARGE crocks below and in the collage. 
Are these new to you?? Hope you're feeling inspired!

P.S. For links, sources, budget, DIY tutorials, and more for our kitchen reno click here.

No comments

8.22.2019

Scary stairwell renovation: paint, flooring, and functional updates!

We neglected an important part of our kitchen (sort of) even though we finished our kitchen reno last month... the basement stairwell and side door that lead into our kitchen, and are our most commonly used entrance to the house, were terrifying!! Dirty 40-year-old vinyl, wallpaper, stained ivory trim, constant dust, piles of shoes and boxes of soda... NOT what you want to see when you walk into your home every day!

We made a few small changes over a couple of weekends and totally transformed this functional space!

No comments

8.08.2019

You know you want to know: DIY kitchen reno BUDGET

Creating good design on a realistic budget is one of my primary goals in our home renovation. I love watching designers create beautiful homes and transformations, but I can't imagine ever spending $75k (or more) on a kitchen. No judgment for those who do, it's just not my style.

I am so proud of how our kitchen renovation turned out AND I am proud of how we kept it affordable. Replacing our cabinets meant this was not going to be an under $2,000 DIY kitchen reno like our last one, but still--this project was WAY more budget-friendly than most of those I've seen around the blog/design world lately and I hope it inspires you that you can do so much with your space, even on a budget!

I'm sharing ALL the details in this post!

No comments

8.01.2019

DIY building and installing cabinets to finished kitchen! VIDEO

Looking back on where we started with this kitchen reno two months ago... I am so proud! We worked so hard to do this completely DIY kitchen project and learn a ton of new skills, installing kitchen cabinets one of them!

I put together a video of the steps involved in getting our new cabinets built, installed, and in use.

Thanks to Walcraft Cabinetry for working with me on this reno by providing me a discount on our cabinets!

Here's the video, which you can also see on my YouTube channel. I am working on posting there more often and would love if you would subscribe to me there so you don't miss my next videos!

As for all those posts I talked about... See the full reveal HERE! And check out other posts on this DIY kitchen reno:
Hope that was helpful if you're considering replacing your cabinets!!
No comments

7.25.2019

Comparison of budget-friendly kitchen cabinet sources (IKEA and beyond!)

Cabinets are often the biggest, most impactful, most exciting, even most expensive part of a kitchen reno. I put a LOT of thought into where we purchased our cabinets from and am happy to share my research with you!!

As you may know, we just completed a full kitchen reno, entirely DIY. (See the full reveal here!) Here's the scoop on our cabinet decision!

No comments

7.22.2019

Modern traditional DIY kitchen reno REVEAL!

I LOVE THIS KITCHEN!!!! Such an exciting day after lots of hard work in here!

Almost two months ago now we demolished the cabinets, flooring, trim, and lighting in our 1980's oak kitchen and rebuilt everything ourselves. The end goal: the white kitchen I've been dreaming of since Pinterest began (!), plus some very 2019 touches including a modern traditional/updated classic/Emily Henderson-approved vibe.

The budget: not much to speak of. The time commitment: ~5 days of work work work, then another couple weeks of fixing this and that during baby naptimes. We learned new skills, made mistakes, made messes, cleaned (most of) them up... and I got to carry out my design vision for a space starting from scratch!

Modern traditional DIY kitchen renovation


I am so excited to reveal our modern traditional, entirely DIY kitchen renovation!

No comments

7.18.2019

DIY custom straight-sided vent hood with Zephyr insert

This is the LAST tutorial of our kitchen reno!! We've done the whole project ourselves so there are lots of DIYs to share with you, but this one was a brand new skill for us and I admit I was a little nervous before starting--but it turned out to be one of the most straightforward projects!

We wanted a modern, sleek, straight-sided built-in vent hood over our range, with an attractive insert visible underneath (as opposed to an independent, up-the-wall stainless steel vent hood like at our last house OR one that looked like part of the cabinets). After collecting lots of inspirations and ideas, we built this hood cover from scratch and used a high-end but affordable insert from Zephyr!

No comments

7.11.2019

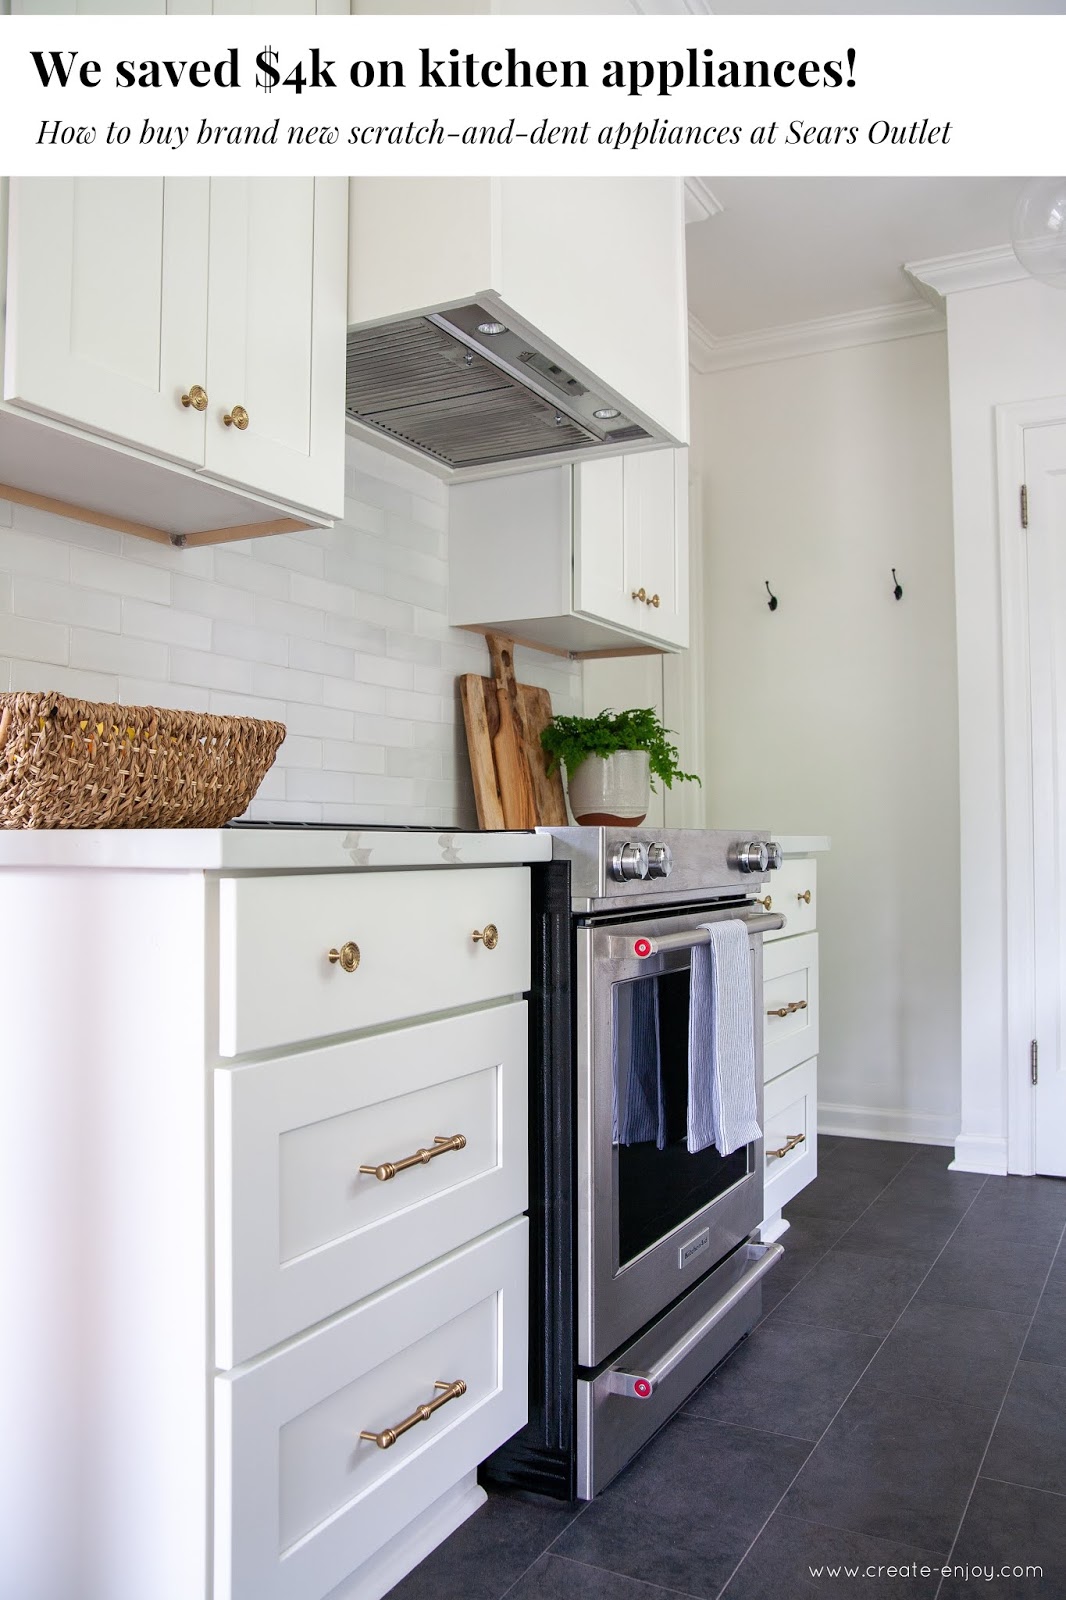
How to save $4k on appliances for a full kitchen reno with Sears Outlet!

While the first goal of our kitchen renovation was updating everything to a style we like, we also had to choose function-heavy pieces like new appliances. Appliances are not cheap, no matter where you get them, and our budget for this project was on the very low end of kitchen renos!

The cheapest appliances are usually not the most attractive (and the prettiest ones are crazy expensive). But I really didn't want to replace our fridge and range with plastic-ey, modern-looking, builder special stainless steel ones. We also wanted special features--panel-ready dishwasher, slide-in range (not freestanding), and counter depth fridge!

So I looked around for scratch-and-dent appliance places near me. In that search I found Sears Outlet. They sell brand new appliances at the lowest prices you'll find in-store or online--floor models, lightly scratched pieces, last season's models, overstocks... they have huge selection and all the same brands you see elsewhere.

I did the math... buying scratch-and-dent appliances like the ones we chose can save you about $4k!!! These are not builder basic appliances, either--like, we got the most beautiful KitchenAid range from Sears Outlet. Check out the price comparison and my favorite stylish appliance options for our modern traditional full kitchen reno!

Thanks to Sears Outlet for providing our range in exchange for this post! You can shop Sears Outlet online or at a store near you!

Remember you can also check out other posts on this DIY kitchen reno:

Affordable, traditional-look appliances


You can see the kitchen design elements below... I decided the straight-lined, chunky handles on KitchenAid appliances would be best for our traditional-leaning kitchen. Handle style is so important with appliances! Metal color, too; some brands' stainless steel is more on the blue-grey side, whereas I liked the warmer tone of the KitchenAid metal.

The first appliance we chose was the new range. We weren't switching to a gas range, but I wanted a slide-in (that is, controls on the top front rather than standing up 8" or so at the back). Slide-in ranges are never cheap. Even the lowest price one out there is close to $1,000 (and it's not cute). But it was really worth it to me to have that sleek look of countertop all the way across the range wall (plus it's easier to keep clean). I found the perfect KitchenAid glass top slide-in range, with extra features like a back venting option and non-stinky self-cleaning.


No comments

7.08.2019

DIY, budget-friendly floating-look open shelves!

I knew I wanted to include open shelves in our kitchen because I loved them so much at our last house! We did very simple DIY wood + metal bracket open shelves at our last house, and installed them over tile. It was a DIY success, but they were never that exciting looking.

For this kitchen (lots of white, more elegant, less boho than our last) we wanted more presence to our open shelves. Thicker, stained wood. I looked into floating shelves, but because of our stud locations, we weren't confident we could make any of the premade brackets work. Plus, the chunkier floating wood shelves available now are sometimes $200/shelf! We needed 3, custom length at about 27".

But, because of where the backsplash tile ended, it would have been awkward to use traditional brackets. Instead, we put together some beautiful shelves that have a floating look (from some angles!), have more thickness than a plain board cut to length, and are the perfect rich color for our kitchen!

No comments

7.03.2019

How to choose cabinet hardware, plus my fave traditional kitchen hardware styles

It has taken me MONTHS of mood-boarding and even installing this kitchen, and I have FINALLY chosen our hardware!! Shopping for cabinet/drawer hardware is so fun, but when it comes time to choose one of the amazing pretty styles of basically jewelry for your cabinets, it can be so hard!! I love them all and went back and forth even on finish, size, and layout.

I think I can save you some of my pain, however, with my tips for how to choose cabinet hardware for your kitchen or bathroom reno. I also wanted to share my favorite traditional hardware styles, the ones that were at the top of my list!

Thanks to Sumner Street Home Hardware for providing the pulls and knobs for our kitchen! They are based out of Portland, Oregon like me and I love shouting them out, and their products!

Remember you can also check out other posts on this DIY kitchen reno:

No comments

6.28.2019

So much style, so much function: Our kitchen sink and faucet! Plus why we didn't choose a farm sink

Some of my favorite parts about our new kitchen are the sink and faucet! I debated trendy options like an apron-front "farm sink" and bridge faucet, and in the end chose styles I think are even more classic and more functional!

No comments

6.27.2019

How to lay sheet vinyl flooring in a complex, larger space. Our DIY kitchen reno slate-look vinyl

After we learned that the vinyl flooring in our kitchen had asbestos in the glue, we decided not to rip it out and lay oak flooring to match the rest of the house. I considered tile, but tile is tricky in a kitchen... it's hard underfoot, hard when you drop things on it or kids fall on it, has grout lines that can be annoying to clean, and takes time to lay. But I do like the look of tile--I thought about terra cotta or slate as a solid but varied, rich color.

Then I thought about vinyl. If I could find a vinyl that looked nice (not like the dated stuff we were covering up, or the builder-basic shiny faux travertine look I've had at apartments before), it would be faster, easier, and more cost-effective than any of the other options I considered.


Thanks to Armstrong Flooring for providing this flooring for my review and coverage! You can check out their options on their website and buy at a flooring retailer near you.

No comments

6.21.2019

Unique handmade look tile backsplash - fast DIY but pros and cons!

As I shared the other day, our countertops are in and our kitchen is mostly functional again! After countertops comes tile backsplash, which we installed ourselves.

Choosing the tile... I didn't commit early enough on our tile so made a last-minute decision and have had a roller coaster of feelings about it! But it's up--we installed our entire backsplash in about 7 hours total, less than half the time we took tiling at our last kitchen!! This type of tile went FAST, but had both pros and cons!

DIY tiling


Ah, tiling! The classic DIY-able project that anyone can do, but so many are intimidated by! I helped my mom with tiling a few times in my life before tackling our straight herringbone pattern subway tile backsplash at our last house--intimidating project that took 3x as long as I hoped it would--and then felt empowered!! I tiled three bathroom floors at that house (see them all linked here), then one at my friends' house, and now: our kitchen backsplash!

A couple things made this tiling project easier, as I will share in the post, but I had some serious mixed feelings about this tile!

No comments

6.20.2019

Prefab marble look countertops - budget-friendly and DIY-friendly options

Getting our countertops in was a HUGE milestone for our DIY kitchen reno. We are using the kitchen again basically as usual! Countertops are a major part of the expense of a new kitchen, so I shopped around and found a great option for ours from a local place, but I'll share how you can find something similar near you.

No comments

6.10.2019

How hard is it to install kitchen cabinets?? The exciting part of our DIY kitchen reno

It's amazing how much can change in a week!! Last week I shared about our kitchen demo and we've been working HARD all week and have checked so many things off the list. Including installing the cabinets we assembled a couple weeks ago. We'd never done it before, and it was definitely a new skill to learn but pretty straightforward!

No comments

6.03.2019

What it takes to fully demo a kitchen! Our DIY kitchen reno progress

Our kitchen reno is GO GO GO and we got everything demoed over the weekend, and then some. Our temporary kitchen is fully set up in the dining room, ALL the old stuff (cabinets, soffits, top layer of flooring) is out of the kitchen, and we started work on our flooring.

Other posts on this DIY kitchen reno:

No comments

5.30.2019

Building ALL our cabinets, prepping for kitchen demo day!

As I shared here (and in our 2019 projects list)... we are planning a full, DIY kitchen reno! We will demo our whole kitchen this coming Saturday. Until then we have been getting as much done as we can to prep and hopefully make the torn-apart-kitchen phase as short as possible.

We got so much done last weekend!!! We are feeling so positive and motivated about our kitchen reno (--let's hope this feeling holds!)!

Sharing our progress so far...
No comments

Search

© Create / Enjoy • Theme by Maira G.