WELCOME

Hello! I'm Suzannah, a home design lover and mom of two, with one more on the way in January 2027. Follow along with my DIY fixer upper house renovations, design tips, occasional sewing and crafty projects, and de-stressing goals.

I show you how to create a beautiful home that still works with kids!

Subscribe to the blog below and join me on Substack here!
the pillow tutorials
Showing posts with label the pillow tutorials. Show all posts

1.25.2021

Plaid wool blanket throw pillow DIY and long lumbar

It's been a loooong, long time since I did an "upcycle" of a vintage or older garment/home decor piece into something new. That used to be half my posts, back when this was a sewing blog! But I didn't need more and more homemade stuff all the time, and my style changed, and I have way less time for sewing now. But, back to my roots! I recently rename a vintage wool plaid throw blanket into three, unique throw pillows and I LOVE them!

Oh, but not only that--I also made a custom down-filled extra long lumbar pillow using fill from two old pillows we had. It was very messy, but so cool!

No comments

11.18.2014

A very cool woven ribbon pillow DIY

This is quite the project! I have a very interesting tutorial for you today, one I tried without much practice or thorough thought before jumping in. You may know how that goes. But I learned as I went, and am happy to share my tips with you!

Here's my tutorial for a woven ribbon pillow.

I think the inspiration for this project was woven paper hearts I remember making for Valentine's Day as a kid. I think we made paper baskets out of them once? I don't know. I remember liking weaving the pieces together, and being very intent on matching the corners up tightly.

So when Offray reached out to me to celebrate the launch of their new website, and I thought about a cool project using ribbon, the over-under basic weave was the first thing I thought of!

Woven Grosgrain Ribbon Pillow Tutorial


You will need:


  • Grosgrain (or other) ribbon (pronounced GROW-grain, not GRAWS-grain) (I used two colors, two white pieces for every grey piece)
  • Sturdy home dec or bottomweight fabric for pillow base and back (Do not use knit or something lightweight, as it needs to hold up to lots of pins and still stay flat as you add each ribbon.)
  • Zipper (invisible recommended)
  • Pillow form

I used an 18" pillow form so I used an 18" zipper and less than 3/4 yards fabric.


Calculating ribbon needs:

Sometimes sewing projects = lots of math. To calculate how much ribbon you need, divide the width of the pillow by the width of the ribbon. For example I used 3/8" wide ribbon (0.375") on an 18"x18" pillow form and assumed 1/2" seam allowances on each side but no ribbon in those areas. For each direction:

  • 18" divided by 3/8" wide ribbon lined up perfectly = 48 pieces
  • 48 pieces, each 19" long for seam allowances = 912"
  • 912" divided by 36" = 25.3 yards
So 25.3 yards per side, so 50.6 yards total. 

(I did 2/3 white ribbon and 1/3 grey ribbon, so I used about 17 yards grey and 34 yards white.)

I'm pretty sure the fabric store is the most expensive place to buy ribbon, so ordering online is definitely the way to go for large orders like this. (Offray.com now has an online shopping feature.)

Instructions:


1. Prepare the pillow base. (I used the same fabric for the front and back.) If your fabric is all or mostly cotton, pre-wash it and press it before cutting. Once washed and pressed, cut two pieces to fit the pillow form. (I used 1/2" seam allowances for my 18" pillow, and wanted a snug fit, so I cut 19"x19" squares.)

Fold the pieces in half and notch the centers on all sides.

2. Cut ribbons. I started out cutting 10 or 20 pieces, then pinned some and cut more as I went. Kept them from getting too tangled.

My pillow was 18" with 1/2" seam allowances and I wanted a little extra room, so I cut 19.5" pieces.

3. Pin ribbons along one side. You can see my alternating pattern here--two whites, one grey. Put on a good movie or podcast! Lots of pinning.

Leave at least 1/2" at the side for seam allowance and wiggle room.

**If your ribbon is thicker like velvet ribbon, you may want to give each piece a few threads' worth of space to accommodate the bulk when you weave the other direction.

With each piece, on a flat surface, follow the ribbon piece to the opposite end and pin flat.

4. Baste ribbons down. You can use the longest stitch your machine has, since it just needs to take the place of the pins for now while you weave. Use about a 3/8" seam allowance.

5. Pin and sew ribbons on the perpendicular side. Pin only on one side, not across as well.

If you used spacing for thick or fluffy ribbon, match that spacing on this side.

Sew these pieces down with a basting stitch and 3/8" seam allowance as well.

6. Weave! With a consistent pattern, weave each piece through under-over-under-over-etc. all the way through.

My ribbon was stiff enough that I didn't need a needle or anything to weave it through the perpendicular pieces. I found that I could just fold each piece in half or so and use the loop as a pusher to get under the pieces as I wove through. I made a twisty mess most of the time, but the ribbon had enough body to bounce back when I flattened it.

I also found I could do up to four or five pieces at a time, under-over-under-over-etc. all together, but then just had a slightly harder time doing the next pieces individually.

The hardest part was keeping the weave straight as I went. Lots of pulling with my fingernails, pretending to be the pusher on a loom. At the end of each weave, pin the ribbon flat in grain.

Keep weaving until the very end. For the last TWO pieces, I pulled out a big tapestry needle and used it to help me.

But then I realized I had too many ribbon pieces for the seam allowances and I pulled out the four edge pieces (the outer one on each edge), which gave me more room to weave. (After I took this picture--sorry. Just trust me.)

Anchor the pinned edges of the bottom of the weave with a basting stitch and 3/8" seam allowance.

7. Assemble the pillow. As you would any pillow, install the zipper, then sew the faces right sides together. Clip corners, press.

8. Insert pillow form and display proudly!

Here's mine!

Really cool texture to play with as you hang around relaxing on the couch.

(Next to another DIY pillow, of course.)

Because it is so unique and takes more labor than a basic printing or painting project, I think these would make GREAT holiday gifts! I'm always looking for interesting DIY gifts, and this would be a great one. Particularly if you have someone who loves a specific color. Offray sells this basic grosgrain in like every color ever.

Do let me know if you try it!!

It's also a great DIY gift!

Thanks to Offray for sponsoring this post!

9 comments

2.12.2014

DIY heart appliqué‎ pillow tutorial - for Valentine's or any day!

I'm finally getting into the Valentine's Day spirit (late to the party most holidays, actually) after being on vacation last week and pretty busy last month. But, we were snowed in last weekend (3 solid days!) and I got some gooooood festive crafting in while watching the Olympics and cooking delicious root vegetable dishes because that's all that was in our fridge.

I'm not huge into lace and ruffles and frilly hearts, but I do love a good heart shape element (who doesn't?) and I really enjoy playing around with appliqué‎s while watching TV with the husband or spending a quiet afternoon feeling creative.

But I don't think this heart pillow will be retired after this Valentine's Day! I think it works in the living room any time, don't you?

Follow along for the simple tutorial!

 DIY Heart Appliqué‎ Pillow Tutorial


You will need:


  • Pillow form
  • Main pillow cover fabric (two pieces the size of your pillow form)
  • Zipper (I prefer invisible)
  • Scrap fabric in one or more colors (this is a great scrap-buster project for those extra little pieces you have stored!)
  • Iron-on adhesive like Heat N Bond Lite (Kollabora sent some to me for my book projects)
  • Contrasting thread (optional)
  • Basic sewing tools

Instructions:


1. Cut two pieces of main pillow cover fabric. Tip: professional-looking pillow covers fit very tightly to the pillow, so I normally cut them exactly the size of my pillow form (in this case 16"x20") and use 1/2" seam allowances. You can cut 1" larger in width and length to allow for a little more ease if you like, e.g. 17"x21", but much larger than that will look a little loose on the pillow.

2. Mark the centers of the pillow cover pieces (front and back sides) by folding it in half and clipping at an angle. I also marked the absolute center of the pillow with pins (you can use pins or a fabric marker) horizontally and vertically, with the intersection of the pins being the true center. You'll use this when you place your hearts in a symmetrical pattern, if you choose to do it that way (randomly placed hearts would also be cute!).


3. With paper scissors, cut out a heart shape from the iron on adhesive. Copy it as many times as you need for your heart pattern (I used 8 hearts).

4. Iron the paper hearts down onto your contrast fabric, sticky side down, and press them down carefully. (You can see I did this efficiently, fitting the hearts in close, although this is not necessary since you're using scraps!) With fabric scissors, cut out the hearts around the edges of the paper.


5. Now the fun part. Peel the backs of the fusible adhesive off the hearts and place them in a pattern you like on the front piece of the pillow cover.  I did this by measuring along the grain of the fabric and placing my hearts equidistant from each other, splitting the distance between the center lines of the pillow cover. Do whatever pattern you want!

Iron the hearts down onto the pillow cover piece; they will adhere but can't take a lot of wear and tear, so be gentle.

6. At the machine, top stitch the contrasting hearts onto the front pillow cover piece. You can use a tight zigzag (like I did with only moderate patience in this appliqué‎ project and with better effect but worse close-ups in this project), which perfectly hides all the raw edges but takes forever, so depending on how many hearts and how big (I had 8 tiny ones, so no way was I gonna cover all their edges with a short length zigzag!), you may want to do what I did and do a simple straight stitch. Tip: a shorter stitch looks neater and is a little easier to manipulate as you sew.

7. Assemble the pillow cover the same way you would any front and back of a pillow cover. (Insert zipper, match centers and sew front and back right sides together, clip corners.) (I detail this process in this tutorial and this tutorial if you want more detailed photos.)

8. (Optional) Depending on your fabric and how much you plan to open the pillow cover!, finish the inside edges with a serger, zigzag stitch, or pinking shears. My fabric was raveling a ton, plus I love the sound of cutting through crisp fabric with pinking shears. ;)

9. Press seams open and turn right side out. Put on pillow and admire!!

Ta-da! I said this would work for any time, not just Valentine's Day, and look--it goes so many places! I have a lot of grey and pink in my living room, so it works anywhere.

On my recovered Louis XV chair...

On the vintage slipper chairs with the white slipcovers I made (next to the pink curtains I made)...

On our grey sofa with the black/white pillows I made and the painting I did!

Hooray for appliqué‎ scrap projects!
4 comments

3.08.2013

Latest home DIY: Appliqué crux/cross pillow

So, I guess I'm really into making appliqués! Put together this pillow cover over the weekend and it's my third appliqué project in the recent past. ;)

You saw the DIY anchor tee tutorial and the anchor applique pillows, both which I made with a PDF pattern--I made the tee appliqué with spray adhesive to keep it down while I sewed, and I used Fabric Fusion Peel & Stick Tape on the pillow, sent by Kollabora for my book. For these, I cut strips of fabric, strips of Fabric Fusion tape...

And did the same dense zigzag stitch to finish the raw edges of the appliqué fabric.

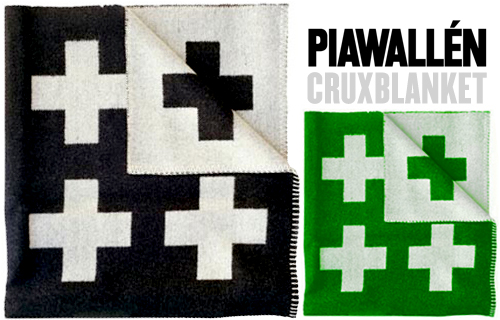
Oh! I should say this pillow was inspired by the lovely Pia Wallén Crux blanket, those amazing bold-colored cross pattern wool blankets from the Swedish designer that sold from 1991 to 2011 for $700-900 USD. They were super cool. (Anna on Door Sixteen even has a tag just for the crux blanket!)


Pia Wallén now makes the Cross Blanket, which is very similar but made of cotton. And still so cozy and chic!


I wouldn't ever feel right making a DIY Pia Wallén blanket, since it's her unique design!, but the Scandinavian modern is definitely a cool look on its own. When I was craving some new pillows on the couch, I pulled out some heavy black cotton canvas duck and some white cotton from the bottoms of some Ikea curtains, and put this together with the fabric tape and my machine.

I love adding a fresh, bold look to the living room so quickly just by adding new accessories.

So, what do you think? Should I incorporate more Scandinavian simple looks to go with!?

5 comments

2.20.2013

Great appliqué technique, and fresh new pillows for spring

Fun project I finished over the weekend--I just love this anchor appliqué I found so much, I had to use it again after I did that anchor appliqué tee tutorial! I'm having fun with preppy, classic colors for spring. (As you may have seen in a sneak peek on my Instagram!)

I had some navy fine wale corduroy that I got at JoAnn but had nowhere to use it... I loooove the fun navy color but couldn't find the right place in the house, although it's pretty good for home dec since it's so densely woven it looks like cotton velveteen. So, I figured, time to switch out the pink velveteen pillows we've had on the bed and go for navy and white. Love doing that with bedding!

I sewed the anchor appliqués, cut out of a nice white twill with a stripey ribbed texture, onto the front pieces of my pillows before I sewed the zippers on and sewed them together. I used a technique very similar to what I did on the tee, but I used lightweight iron-on interfacing to reinforce the letters (and to make the white less see-through). Rather than use spray adhesive to attach them to the corduroy, I used some Fabric Fusion Peel & Stick Tape, which I've never used before for anything, actually! You can see in the pic below, I tore off short pieces and used them to anchor the straight lines of the appliqué down. Kollabora sent me this tape stuff for a project for my book, and I'm glad I got to try it out now! Super easy, just unroll and tear or cut, then pull off the wax paper backing. And... adhere. (I did this rather than mess with a bunch of pins to hold the appliqué down as I zigzagged it on the pillow front.)

Once I sewed the appliqués down, I trimmed the interfacing away. This was not as easy as I'd hoped... next time, I'll cut it to the exact size, or iron it on before cutting out the anchors! Aside from that, these went together great; the heavy corduroy was perfect for soft but sturdy pillow covers. Ta-da!!
DIY anchor pillows-021
DIY anchor pillows-024

Pretty fast, and very easy! Now, to freshen up the rest of the room...

I have some preppy grey and white striped bedding from west elm, but that might be a little much! And just bought more gold mirrors to put up somewhere in the bedroom, too. I love decorating bedrooms, but I guess I'm a more than a little indecisive. ;)

12 comments

4.16.2012

10-minute furry pillow. Win!

Every time we go to West Elm or Marshall's pretty much any home store, my husband has to touch all the textured couch pillows.  Sequins, pleats, cording, or his fave, the furry ones--he looooves them.  I guess some men judge home dec pieces differently than [at least I] do!

Source: theglitterguide.com via Suzannah on Pinterest

Source: livecreatingyourself.com via Suzannah on Pinterest
Source: westelm.com via Leah on Pinterest


I had some ivory faux fur sitting around from last winter; I guess I had had some plans for it but it was too small a piece... whatever.  So I decided to put it to use and make it into a pillow!

For the back I used the same corduroy as I did in this tutorial.  It works well.  Check it out if you want a quick project!

I whipped this one up during the first 10 or so minutes of a HIMYM episode.  My husband loves that, too. ;)
8 comments

3.11.2012

A durable, quality ruffle pillow--tutorial!

You've seen ruffled throw pillows before, I'm suuuuure, but this one's a little different.  I've wanted to do something like this for a while, because who doesn't love ruffle fabric?, and it's so cute on pillows!  But I worried about the stretch of the background of the lovely pre-ruffled stuff--wouldn't it get stretched out as people sit on and play with the pillows?  Would the pillow cover end up loose and floppy after a few months?  Aack!

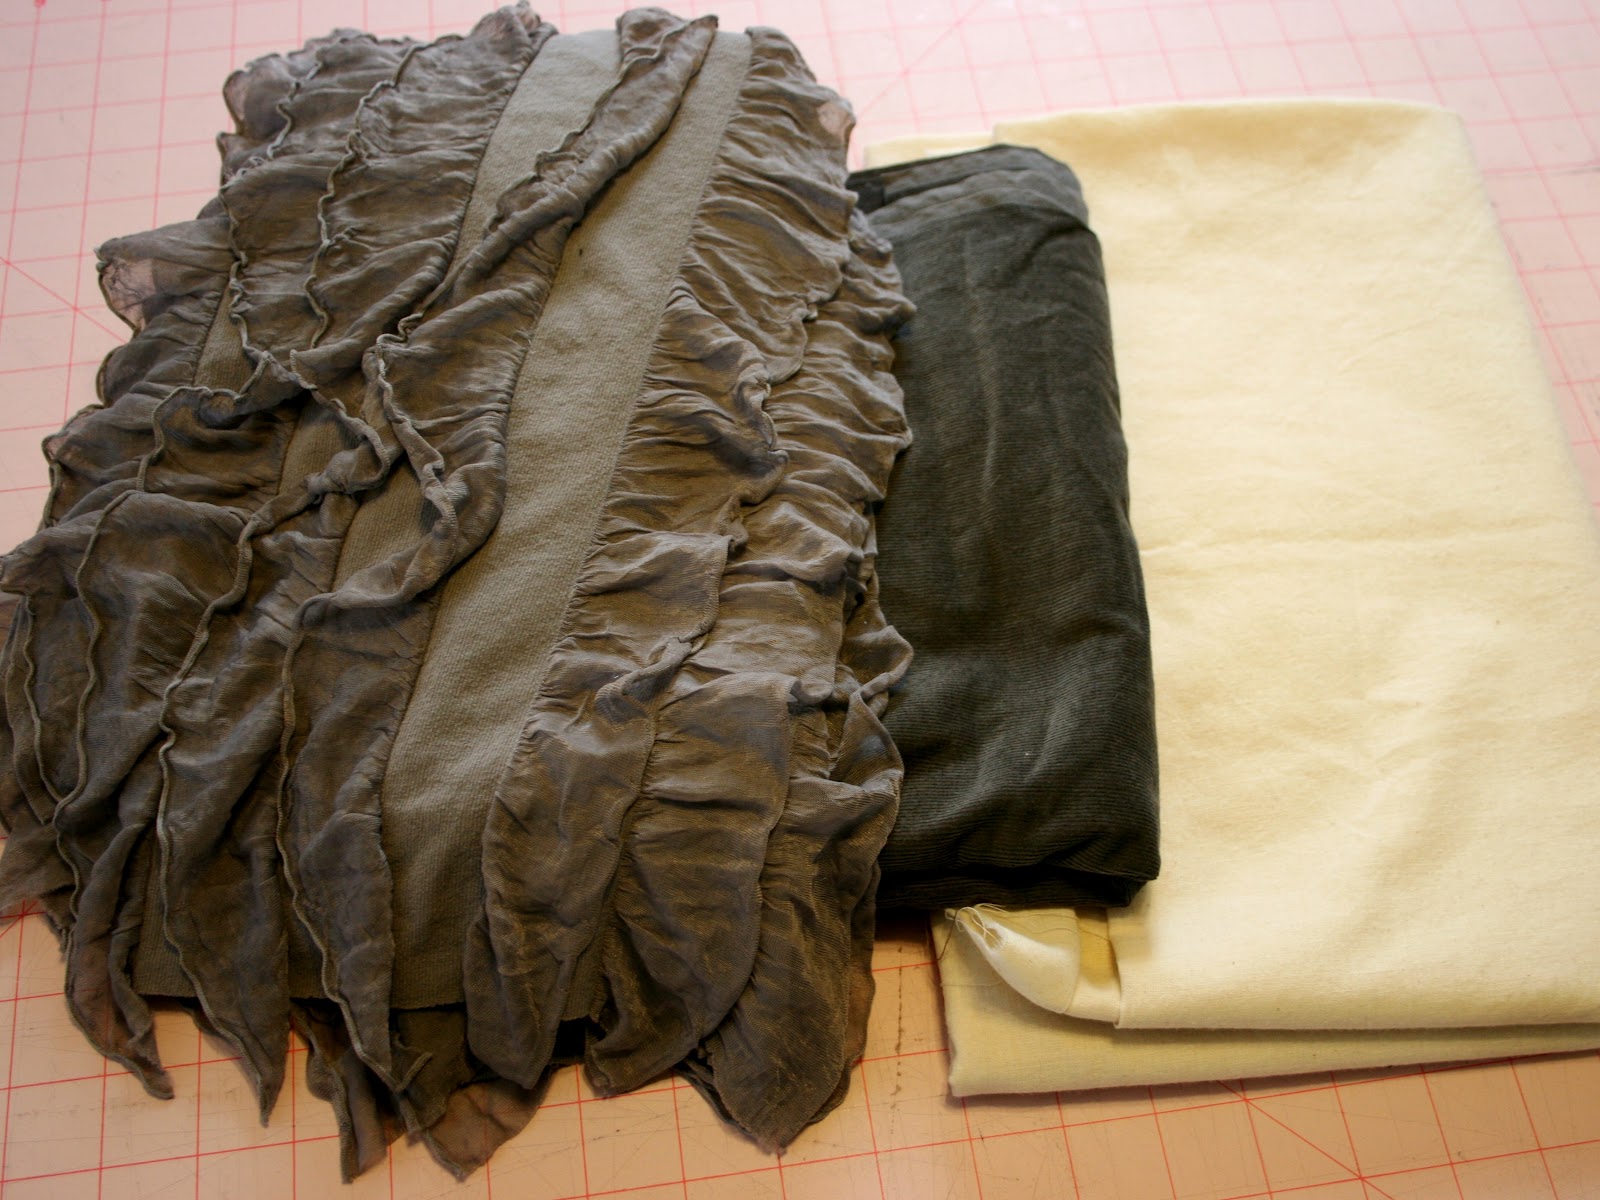
So, I came up with a solution, and here's a tutorial for how I turned some grey ruffle fabric (leftover from this project and also this project) into a lasting pillow!

  • You'll need to start with a bit of of of pre-ruffled fabric, backing fabric (optional; you could do the whole thing ruffled), and muslin or any plain cotton (yardage amounts depend on the size of your pillow).  Could be old quilting fabric you're tired of, something you got cheap, whatever.  Oh, and you'll need a pillow form!  And a zipper.


  • My pillow was 20" square, so I wanted the final pillow cover to be 20" also.  No wiggle room makes it look more professional!  I used 1/2" seam allowances all the way around, so I cut out two 21" x 21" squares of the interlining fabric--front and back.


  •  Then, for the backing, cut out a 21" square of the back fabric.


  • Then for the good stuff.  I cut out a 21" square (approx) of the ruffle fabric--however, it didn't quite line up so I cut it a little smaller.  I wanted to cut exactly in between two ruffles going the long way on the fabric.


  • (To cut down for the other dimension, make sure you lay the ruffles flat so you cut them straight!)


  • Now, you have four pieces--front square, back square, and two interlining squares.  I didn't have a grey invisible zipper of the right size, so I used a purple one--thought the color would be nice, actually.  And was too lazy to go to the store. ;)


  • Now, carefully align your front square and an interlining square.  Pin every ruffle down flat, through all layers.  Pin up the very bottom ruffle so it doesn't get in the way of your bottom seam.


  • Do the same thing on the back.  Lots of pressing flat with your hands to make the squares line up!  Then lots of pins.


  • Now put in your zipper, through both layers of each side...


  • Now, sew both sides together on the other three edges, being careful to keep those ruffles pinned pointing the right direction!


  • Clip corners...


  • And press your seams flat or to either direction, as best you can.


Done!!

Back view...

It almost goes with our grey West Elm bedding and fun circle pillow... can you tell I like grey? ;)


This ruffle fabric stuff is so much fun.  It's so fast and easy to make really beautiful, interesting projects.  Check out Ruffle Fabric if you're interested!

9 comments

SUBSCRIBE BY EMAIL

Get new posts by email:

Search

​
© Create / Enjoy • Theme by Maira G.