WELCOME

Hello! I'm Suzannah, a serious DIYer and mom of two little ones. Follow along with my DIY fixer upper house renovations, sewing and crafty projects, real food recipes, and de-stressing goals.
I believe you can love your home just the way it is, AND have the power to design and make big changes to make it better.
I'm also the author of DIY Wardrobe Makeovers!

11.30.2012

Weekend Inspiration: Holiday home and gifts

It's almost the weekend again! December 1st tomorrow, OMG. We alllllll know it's that time of year again, so I've been thinking a lot about Christmas decor and gifts lately, and unfortunately have not had any great revelations that have made me feel secure and set for the holidays. I am feeling quite uninspired. We set our tree up right after Thanksgiving, and it's the first year we've had a fake one--white! I am so excited, though I feel like a traitor for not getting a live tree, being in Oregon and all. But the white is pretty. I bought it last year right after Christmas and have been so excited to set it up all year--it's not done yet, since we don't have enough ornaments, but I shared a little preview via Instagram last weekend.

Need more ornaments, though. And pretty decor around the house! I didn't decorate at all last Christmas since we were househunting and hoping to find something right around then, and I was tired of our old place and mad at it and didn't want to spend any time decorating while being grumpy about it... so my holiday decorating skills are a little rusty!!

Christmas decor ideas!


So I thought I'd share some ideas and thoughts for Christmas home dec, and please, send me more if you know of any! So, originally my concept was pink and red glitter decor, inspired by these cute acorns...
Source: sweetpaulmag-digital.com via Suzannah on Pinterest

But it turns out pink Christmas ornaments are pretty hard to find, and I'm not sure how I'd want to DIY them. Haven't seen any yet in the right color of pink, so I may just give in and get some hot pink ones. This look is pretty cute, too!
Source: houseandhome.com via Suzannah on Pinterest

And bright pink and red, of course, would go with the red and pink Kate Spade dress Taylor Swift was wearing on the cover of our *cringe* Parade Magazine last weekend. Love the dress, though!!! Have a similar bright red one cut out already.


Of course, those would all go well with the pretty ConfettiSystem ornaments and goodies at west elm this year... have you seen their holiday catalog?! So many pretty things!
Source: westelm.com via Suzannah on Pinterest

At one point, I also had big plans for a pretty DIY tree skirt, and making a tree topper. But, the inspiration was fleeting, and now I don't know what I was planning to do!

Some friends and I are planning to attend at least one of the west elm holiday decorating workshops this month--every Thursday till Christmas! They're having them at several west elm stores across the country, so check them out here if you want to visit and be inspired. And if you're in Portland, come to the gift wrapping class on Thursday the 6th, and I'll see you there! And call ahead to RSVP. Would be great if I could learn something about stylish tablescaping or entertaining. I feel like I know nothing. At a loss!!

As for gift shopping...


Then of course there's also the gifts to think about. I love picking out gifts for people who are fun to shop for--people whose tastes I know pretty well, I guess, although it can be stressful to buy for some people in my family and circles. I always look at those "gift ideas" magazine spreads and blog posts and idea boards and think, um, would I ever actually buy any of that for anyone!? I feel like the gifts I end up getting are so random. From little random shops here or there, or some combination of goodies that go together. Or just a book. Saving up some fave book ideas, maybe I'll make an Amazon roundup sometime. =)

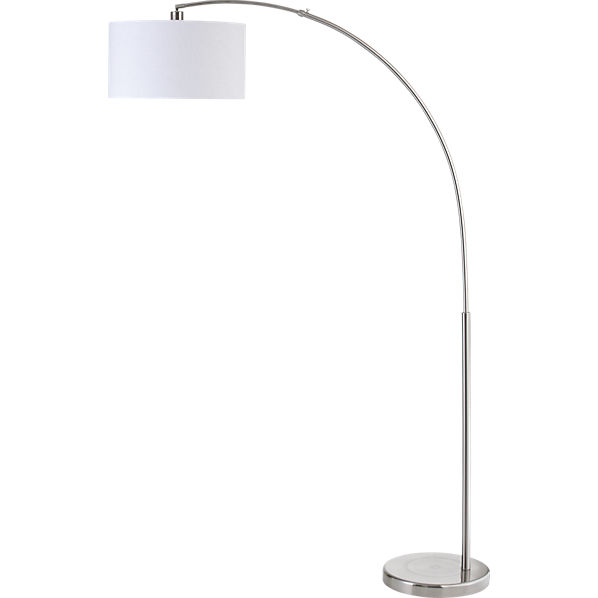
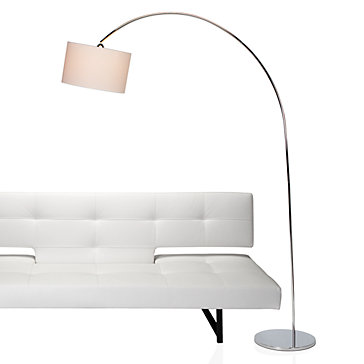
I do have some time, at least, to look around before Christmas. And keep reading gift guides and trying to be inspired! Like, I've been going through the ModCloth gift ideas page for alternative gift ideas, though the problem there is I may just find things I want for myself. One fave so far?

The Lampersand.

Maybe it's just the Christmas colors that are getting me. ;) I'm a little desperate for holiday cheer in my home.

Any Christmas decor tips, send 'em my way!

9 comments

11.28.2012

Easiest DIY canvas wall art... super simple tutorial

Super fun and easy DIY wall art tutorial today. I haven't done a DIY canvas project in ages, but something got me excited for this one, and I put it together in a few minutes over the weekend and figured I should share. The best part about it may be the gold glitter lettering!, although using them in a new way (these are the iron-ons  meant for t-shirts) and to hang on the wall makes me happy, too. =)


Ready?

DIY Glitter Letter Wall Art Tutorial

You will need:
  • Small art canvas
  • Iron-on lettering
  • Big ruler, like clear quilting ruler
  • Scotch tape!
  • Clear spray enamel
1. Measure to find the center of your canvas. Mark a few light pencil dots along the center line. 

2. Put the center letter or space on the very center point you just found, and fill in the other letters on that line. (My words had 24 letters, so I put 8 on each line, with 2-3 words per line).

3. Line your words up with your ruler, keeping parallel to the center line dashes. Put a loooooooong piece of scotch tape over your letters--don't let them move! 

4. Flip the canvas over and iron the words lightly. Then, flip back and take off the Scotch tape. The letters will definitely be stuck on already! They don't need much heat to adhere! Once you've taken the tape off, flip it back and give it a more thorough pressing.

5. Space out your next line using your ruler (a clear one is so helpful here, so you can see the original straight center line), again putting the center letter or space of that line at the center of the canvas. Repeat steps 2 through 4. 

And so on until you have all your lines. OMG, wasn't that easy?!? Now erase your pencil markings if any of them didn't get letters put on them to cover up.

6. This last step is probably optional, but I think it'll be great to protect against dust. Give the canvas a very,  light coat of clear spray enamel! Be warned, sometimes this stuff has a slight yellowish or tannish tint, but if you only use a little it shouldn't show up.

Done!!


So fun and soooo easy!
11 comments

11.27.2012

Three great skirts for fall, made without a pattern

Three-in-one today, folks... I got on a roll last week and made three awesome simple skirts for fall, inspired by some pins I've been mulling over for a while, and they're all sort of in the same genre so I wanted to share them all together.

I want to wear skirts more, but don't always want to feel too dressy or business-ey. I like the look of midi-skirts and gathered shorter skirts, but had yet to find any I feel chic enough in! ;)

But here are my inspirations for the fun creations I came up with this season.

So, with those in the back of my mind, and with a collection of fall fabrics in the stash... I whipped up these THREE skirts last week and am so excited to rock them! The midi length is new for me, and the longer, gathered miniskirt could be tricky to wear, but I'm stoked!

This one here is a great heavy knit stripe I got at Goodwill... I don't wear much black but I always like the combination of black and brown when it works. The fabric was super wide, so it's just one biiig panel with a seam up the center back. Gathered then zig-zagged to the elastic waistband, and just a once-turned-up hem since it won't ravel or roll.

Then this one... I also really love this acorn-colored-ish double-knit fabric, same one I used for my ice skater dress last fall (which I turned into this peplum top, worn here), and I actually cut this one out ages ago. Finally got around to making it. It's also just one big panel, seam and invisible zipper up the center back, and self-fabric and self-fabric lined waistband. I gave it directional knife pleats pointing toward the center front and back, with box pleats on the hips.

And last but not least... wow, sheer animal print... can I pull it off?!? I've been seeing sheer leopard print this and that, and thought about a leopard print blouse at Ross the other day, but am glad I held out for something a little less bold, I guess? Found this leopard print at JoAnn on half-off the clearance price just the other weekend and bought 5/8 yard, I think. Kendi looks so great in hers, I wanted one, too! I lined it with a tan poly lining and gathered them both together, then zig-zagged to the elastic waistband. OMG I hate working with sheer and slinky polyester. Good thing I just needed them in rectangles, since they do NOT cooperate and I really like things to be perfectly on-grain. I just tore them at the right lengths, sewed center back seam along the selvage, and then hemmed.

Okay, now I'm set for fall skirts! Will have to get creative with some fun outfits with these, add some tights, all that. Skirts are super fun but it gets chilly in the winter... time to pull out the riding boots!
15 comments

11.25.2012

A glorious weekend, and a fur snood tutorial

I have been living it up this holiday weekend... not really, but have been seriously enjoying the time off. Four whole days! It feels like it's been a loooong time since I've taken a break like this. But, still lots to think about and do with the house and book and all!

I've had some time to get crafty this weekend, with a couple simple little DIYs (Instagrammed here) and some preparatory shopping at JoAnn and Goodwill on Friday. But also, made this amaaaaazing fake fur snood the other day and am loving it. Simple instructions below!

Okay, so maybe it's a "snood" (some combination of... scarf?? and hood? snarf and hood? whatever.) or I've seen it called a cowl, which makes sense to me, but apparently these are this year's infinity scarf. ;) Cute in chunky knit or, in fake fur! ASOS has several...in the $30-40 range, they have a few choices... examples here and here

So of course I wanted to make myself one. I had some fake fur left over from various projects last year, and found this to be the easiest 10-minute project ever. Literally made it during less than the first half of some New Girl episode on Hulu so I know it was fast. Wanna try??

Fake Fur Snood Infinity Scarf Tutorial


You will need: 


  • 1/3 yard of fake fur. Approx. Less if you want it skinnier.

That's it. Seriously, super easy.

Instructions:


  1. Cut down the center fold of your fake fur yardage--the short side, on the fold that came from the fabric store,parallel to the selvage edge. 
  2. Put your two pieces right sides together and sew along both long sides, making a skinny tube. I use 1/2" seam allowances.
  3. Turn the tube right side out...
  4. Pin right sides together on the short end, and sew almost all the way around the join--leave about 4" open.
  5. Turn under the open edges about 1/2" or whatever your seam allowance was, and topstitch along those 4" on the right side of the fur.
OMG! Done!

Seriously, go make one. So easy and SOOO warm and cozy! I've been wearing it a lot!

13 comments

11.21.2012

Jewelry storage problem, and partial DIY solution...

Simple DIY to share with you today... since we moved into the new house I've found I need new solutions for a lot of simple dilemmas I had worked out before, like how to store jewelry, scarves, cutting boards, um, paper towels... all kinds of normal stuff! So our new bedroom setup is a little different than at our old places, and I didn't have the perfect jewelry storage place. I don't want to clutter up the bathroom counter, or my dresser, with the mix of boxes and skirt hanger for big necklaces I had on a hook before... well, that one was always messy, but now that I like the rest of our room, I care more.

Anyway, I wanted to transition away from the bulky jewelry box, and get some pretty dishes or little rack for small jewelry. I still want to work up some hook situation for the big, chunky necklaces, but for small ones and earrings, I needed something smaller. DIY coming up, right!? So here are some of my inspiration images for the perfect pretty jewelry storage...
Source: apartmenttherapy.com via Suzannah on Pinterest
Source: thedoctorscloset.com via Suzannah on Pinterest
Source: designsponge.com via Suzannah on Pinterest

And I really kept my eye out for some cool jewelry stands or dishes. I bought a pretty branch-ey rack at Ross but it didn't store much and was annoying, so I returned it. :/ But then, I found these at Goodwill. (the Before...)

The silver was not my style. So, I spray-painted, and...

Necklace, ring, watch, bracelet, and dangly earring storage! Perf. Now I just need the perfect little teacups or something for the stud earrings, and I'm set. Still not sure if these will live in the bedroom or bathroom, but at least they go with the decor in both. ;)

Do you have the perfect jewelry storage solution?? I'd love to see pics of it in action on your blog or Instagram, or pins of your inspiration!

12 comments

11.20.2012

Weekend How to Wear DIY: The remade peplum top, with an edge

Had a great weekend last weekend, and have a great How to Wear DIY to share with you! First... so, I remade that dress into a peplum top recently, and wow, do I like it better as a shirt. Wore it with my totally hardcore *not* fake leather jacket, cuffed jeans and wedges... can only get away with this look for a little longer before it's too cold! Or rainy. Wore it for the five seconds of dry weather before the downpour began and has continued...
 Jacket: Ross (similar/similar/similar). Jeans: Levi's. Shoes: Target via Goodwill (similar).

Also last weekend--we went to the Portland Bloggers November event, an SEO workshop with an SEO specialist from this super cool local web marketing company who tailored his presentation toward bloggers. The twenty or so of us at the event are used to writing our blogs, keeping up on social media, doing our best with design, etc., but none of us knew much about search engine optimization! So we all learned a lot. My husband even had a good time. and, as always, Jenni of A Well-Crafted Party did a great job with decor and swag! Here's my Instagram of my husband's Portland Blogger pride. ;)


So, great weekend and now, only a couple more days till the big Thanksgiving holiday!

6 comments
Weekend inspiration: The urge to create something beautiful

11.16.2012

Weekend inspiration: The urge to create something beautiful

Wow, am I so ready for the weekend. I really hope I get a chance to do something creative and pretty this weekend, since I've been feeling a little dull lately...last weekend all I wanted to do was make something beautiful, like style something--a coffee table or a vignette in the entryway or dining room, maybe?--but I feel like my supply of pretty things and creative inspiration has run a little dry!

Know that feeling, where you just want to build or create something from nothing? It's like I'm itching to produce! If I have time for sewing, making a new dress or some pillow covers might help, but I also hope to find some new pretty things for the house if I get a chance to stop by some fave stores. Siiiiigh.

But, here are some recent pins that are keeping me going. Inspired for the weekend's creativity and hope I get to spend it around beautiful things!


Pretty things make me happy. Do you know that feeling, where you just want to be energized by creativity and beauty? How do you get out of a blah rut???

4 comments

11.15.2012

Spray paint Ikea hack--partial success at a lamp makeover

Simple house project to share today. This one's a partial success... let me explain. Our living room was looking a little boring, empty, under-furnished, even by my somewhat minimalist standards... and my interior decorator friend Adi suggested a big, cool floor lamp in the corner. Yes!! Something to fill the space and serve a good purpose.

I love tripod lamps but we already have one, and it's not super huge and imposing, so something even bigger... one of those cool modern arc lamps would be perfect, we thought! So here's the space...

And here's some inspiration...
Source: cb2.com via Suzannah on Pinterest


Source: apartmenttherapy.com via Suzannah on Pinterest

Pretty, pretty! I particularly like the white shades. So, I looked around and found these arc lamp choices...

The Enzo lamp from Z Gallerie

The Target version


And, the Ikea Regolit--which is HUGE compared to the other two, btw... not the same scale.

So, okay, some choices, reasonable prices, all that. But, I also checked Craigslist and found someone selling an Ikea Regolit for $20, and I picked it up on my lunch break one day rather than drive all the way out to Ikea! I was sort of desperate for decor pieces, too... I get that way sometimes. Just gotta style something, ya know?!

Anyway, I bought the HUGE Ikea lamp and was happy that it was big and showed off that empty corner so nicely, but liked the metal legs of the others much better. So, I DIY'ed an improvement for it, as I am wont to do...

The lamp is in lots of pieces, and you put it together, so before I did that, I spray painted allllll the metal pieces brushed silver. It looks way cooler now, I think...

(Now you can see what's poking into the top righthand corner of the first living room pic!)

But anyway, now I have a dilemma. I'm not in love with it, and it's a little toooo big, and... there are so many other cool lamps out there. Even at Target--like this beautiful white chunky floor lamp...

Which is, of course, a lot like the Z Gallerie Mariposa lamp...

Which is a lot like a very similar one at West Elm. But then, I think any of those might not be big enough to fill the space, anyway, so maybe I would still need a big arc lamp...

To complicate things, I found the Target arc lamp at Goodwill, brand new in box donated by Target, for $30 the other day when I was in a rush and bought it. I haven't set it up yet but I'm thinking I may have to sell my Craigslist/spray paint one and replace it with the perhaps more appropriately sized Target one. But, I realized I had to blog about my spray paint Ikea hack before I do!

So what do you think? What lamp shape and size do you imagine in that corner??

13 comments

Search

© Create / Enjoy • Theme by Maira G.