WELCOME

Hello! I'm Suzannah, a serious DIYer and mom of two little ones. Follow along with my DIY fixer upper house renovations, sewing and crafty projects, real food recipes, and de-stressing goals.
I believe you can love your home just the way it is, AND have the power to design and make big changes to make it better.
I'm also the author of DIY Wardrobe Makeovers!

ORC Fall 2019
Showing posts with label ORC Fall 2019. Show all posts

11.09.2019

Favorite One Room Challenge reveals Fall 2019

This is SUCH an exciting time-- 200+ designers and bloggers have just finished making over rooms in 6 weeks, sharing all kinds of details with us along the way. Most of the reveals have been posted and there are some truly incredible projects, as well as some that I'm taking major style notes from!!

Sharing a few faves here! Visit the One Room Challenge blog to see all the guest and featured designers' rooms!

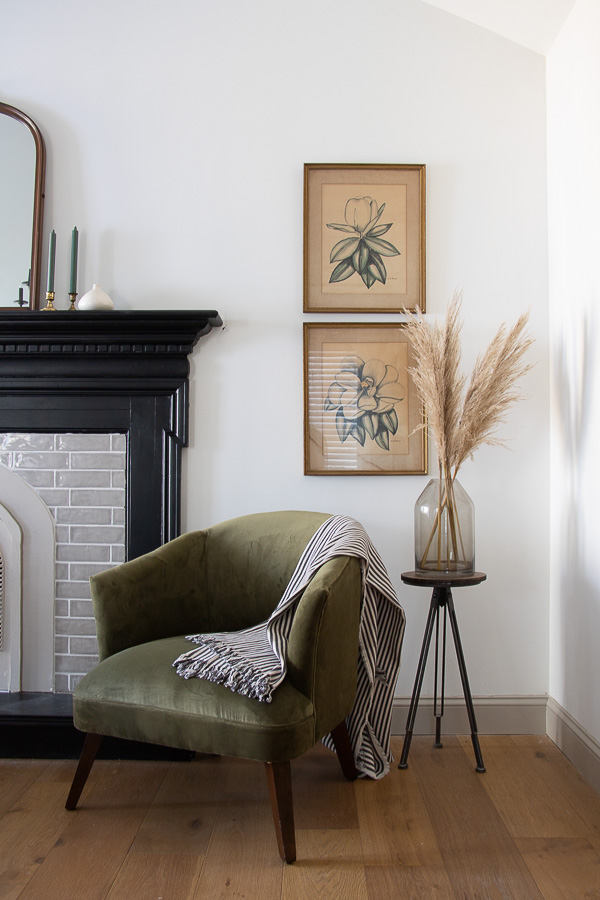
@seekinglavenderlane did this classy modern traditional master bedroom... so rich and grown-up, but still plenty interesting with the great contrast between black and white, and rich character-filled texture!

No comments

11.06.2019

100% DIY modern traditional full bathroom reno REVEAL and budget: Week 6 of the One Room Challenge!

This project was possibly our biggest so far--it felt harder and longer even than our kitchen! I was intimidated to tackle it and it was not easy at times (hours and hours of tiling after work and on weekends!), but it's done and we are SO happy to have this beautiful, luxurious modern traditional style bathroom to use every day!

This post is part of my series of 6 posts about the 5-week One Room Challenge. You can see all my posts about this project here. Previous posts so far:

I was overwhelmed before we tackled this project, overwhelmed during it, and tired after. It was hard. It involved so many steps and DIY skills, I'm glad we did it after working on five other bathrooms and two kitchens! I feel exhausted but proud of this hard, but successfully completed, room renovation. Just being honest about it--the transformation pics are satisfying, but it was not an easy road!

No comments

11.01.2019

How to replace a shower! Tile and shower door: Week 5 One Room Challenge full bathroom reno

We are getting SO close!!

Redoing our shower was a huge milestone of this complete bathroom reno and we were a little apprehensive about it--building up a wall, tiling all the walls and floor, rebuilding the curb, and installing our beautiful new shower door. We've redone several bathrooms before but never changed the tub or shower!

We've now installed the shower door and it looks amazing! Here's how to install a glass shower door yourself (plus some tips on how to tile a shower!).

This post is part of my series of 6 posts about the 5-week One Room Challenge. You can see all my posts about this project here or listed below:

I was so excited to find Dreamline Shower Doors when looking into replacing our shower... They make very affordable shower doors in a huge range of sizes/configurations and styles! Eight different metal finishes, and options from a modern frameless to a Victorian-inspired black-framed multi-panel door/wall set. (They have shower enclosures, too, so you could use them to add a shower--this beautiful French corner enclosure kit comes with the pan and everything.) But I digress...

We replaced our glass block shower (see the "before") with a 2x4 framed wall and flat panel frameless sliding shower door. I was so happy to find this adjustable frameless shower door/panel from Dreamline for under $600. We got several quotes from local places for replacing the glass blocks with glass panels and they were all over $2k. Dreamline has so many stock and semi-custom options for way less!!

Thanks so much to Dreamline for providing this shower door for our review!
No comments

10.23.2019

Bathroom jewelry: Lighting and hardware. Week 4 of the One Room Challenge

It's almost time for the fun part!! I'll be tiling our shower every night this week, but other than that we are SO close on this bathroom reno.

Some almost-final touches have been going up... our beautiful new updated classic/modern traditional light fixtures and towel bars/vanity faucet/hardware!

This post is part of my series of 6 posts about the 5-week One Room Challenge. You can see all my posts about this project here or listed below:

First, here's the bathroom progress to date. Still lots of grouting to do, and we need to install the ceiling trim (and finish the shower, which is currently ready for tile and just has the emerald green waterproofing on). Okay, with that caveat, let's focus on the pretty details that are in!
No comments

10.16.2019

How to PHASE a bathroom reno (keep that shower as long as possible!), tons of wall tile, and painting tips: Week 3, One Room Challenge

We're in the middle of the work for our bathroom reno, and I think the middle is probably the worst place to be. The design excitement is over, you've had your house torn up for a while, you're tired of things being in weird places, it's starting to look better but you're working on it alll the time, and there are still hurdles to cross before you're close to done.

But we've made this reno as painless as possible in a few ways, and I'm sharing about those today. This bathroom hass (basically) our only shower and bathtub, so we phased demo and construction to leave the old shower in place as long as possible. We also are phasing wall tiling, as there is SO MUCH of it to do. Finally, fit in the most time-consuming parts of painting strategically.

Bonus to this post: details and pics on the terrifying shower demo I've been dreading!!

This post is part of my series of 6 posts about the 5-week One Room Challenge. You can see all my posts about this project here or listed below:


No comments

10.09.2019

How to lay mosaic tile flooring!: Week 2, One Room Challenge bathroom reno with hexagon floor

I have a love/hate relationship with tiling. I LOVE that it is a totally doable DIY and is not technically difficult. Anyone can do it, with a few tools and confidence. I HATE how long it takes (on walls) and how many steps there are, with annoying running out to the backyard to mix more mortar or grout... it's messy and hard on my back and takes longer than it should. BUT it is a great way to improve your home and if you do it yourself, it can be cheaper than hiring out installation of even the cheapest flooring products!

Good news is, I've tiled FIVE bathroom floors now and the verdict is in: mosaic tile is the easiest to install!! I'm sharing a full tutorial for how we replaced our old linoleum flooring with hexagon mosaic tile below. You can totally do this!!

This post is part of my series of 6 posts about the 5-week One Room Challenge. You can see all my posts about this project here or listed below:

Tiling is a great skill to learn and starting with a nice, horizontal surface like a floor is a good way to learn. This tutorial will walk you through installing mosaic tile (that means sheets of smaller tile on a mesh backing) on a floor like a bathroom.

Start by demoing your previous flooring, down to the subfloor (usually particle board or plywood). I do suggest you do some research for the right base for your tile backer board depending on your previous flooring and subfloor. Also, note how much clearance you have under your door to the existing floor... we had sheet linoleum and 1/4" or so of clearance, so after we removed our flooring but added 1/4" of backer board, mortar, and 6 mm high tiles, we did need to trim down the door.

Project-specific conditions aside... on with the tutorial that you can use as soon as you're ready for tile backer board!
No comments

10.02.2019

Main bathroom full gut makeover: Week 1 One Room Challenge! Before, design, and demo!

Bathroom reno time!!!!!!!! Our main bathroom is a huge eyesore and mix of pieces from over the decades, including denim blue trim, multicolored reddish tile, and glass blocks on the shower. YIKES. It lacks storage and yet has bars and shelves everywhere on the walls, and the floor is cracking around the shower. It's on the main floor of the house and we is the main bathroom we use--it's also our only tub and shower right now! It will be a massive project to redo it and I will be sharing all about it with you over the next 5 weeks!!!

No comments

Search

© Create / Enjoy • Theme by Maira G.