

Transforming dated doors with paint and hardware (step-by-step and video)
I have run away from honey oak doors and trim while house-hunting both times now. There was a turning point in the early 2000s, I think, when homes started having white trim instead of oak (or the earlier darker wood), and every house we looked at where that was the case was a huge relief for me.
But our current home was built in 1992, and everything is oak. (Including the cabinets in all the bathrooms and the kitchen--just you wait till we get to take care of those!!) Since this home needed so much work and we were going to be redoing everything, I didn't shy away from the dated doors this time around.
I did, however, feel a little overwhelmed by all the work involved in redoing an entire house's trim. We pulled up the baseboards when we removed the carpet and most of them were so damaged they weren't worth saving, so we will replace those with new white ones, but the door and window trim is staying. I was worried about covering the oak grain, hiding brush strokes, and just covering all that area with paint! I worked with Orchard Supply Hardware on this post--they covered the cost of the materials--and I got some great advice from Dave in the paint department at our local OSH store on the products to buy and how to do it! He described the steps so simply and I figured, we can totally do that, and soon, so we took down the doors and hardware a few weeks ago and are putting them back up now! And look what a difference it makes!
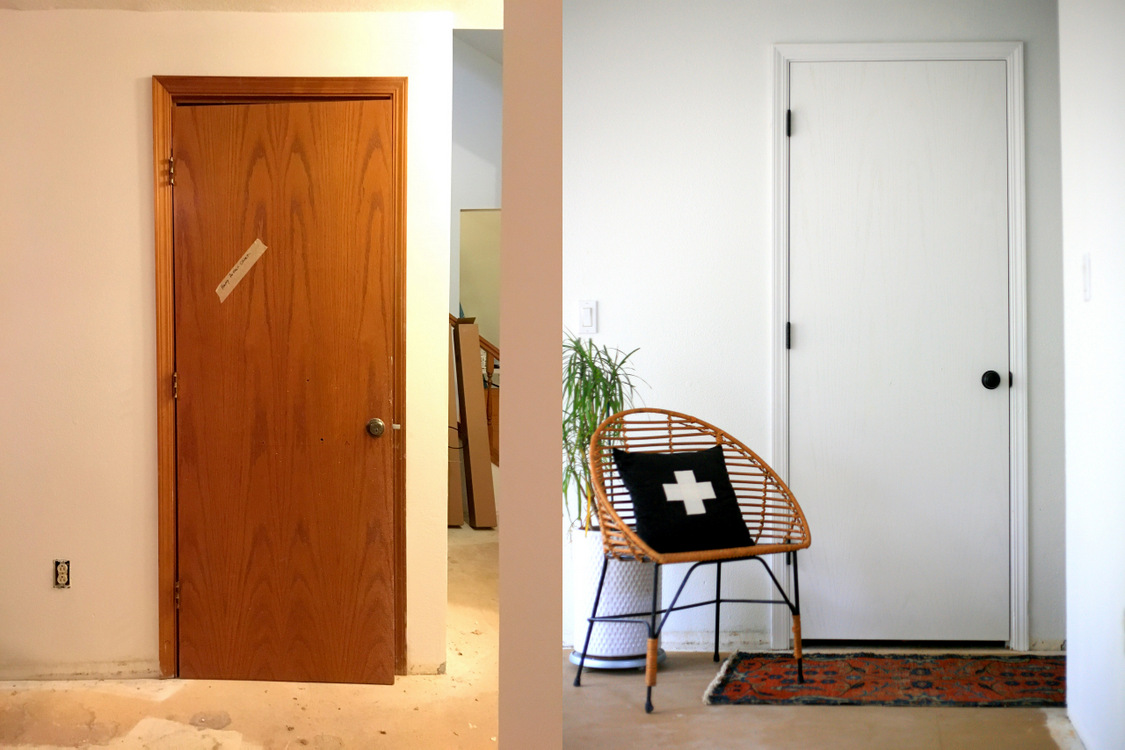
This is the door to the closet under our stairs (our "Harry Potter closet," as the tape label says in the "before"). Like, wow, amiright? (And it will look even better when we have our flooring and baseboards installed!!)
OSH recommended Benjamin Moore Advance paint for the trim and doors, a very cool, advanced paint that is oil-based so it dries slowly, but only needs soap and water cleanup. The slow drying time gives it time to flatten out so brush strokes don't show. It's kind of like magic when it dries, so smooth almost like an enamel!
Updating the hardware was also important to us. The shiny 90's brass was just not our style. ;) We debated a lot between modern black levers and black knobs and ended up with the knobs because they're a little more universal/less dedicated to one modern style--and my dad warned us about levers taking more strain on the screws since there's more force pulling them down. (I'm not sure how much of an issue that would be in this kind of residential use, but it did make us wonder.) We counted all the knobs we needed by type and bought all the bathroom/bedroom ("privacy") knobs, closet ("passage") knobs, and bi-fold door knobs, plus the keyed one for the garage.
We also bought hinges, which come in sets of three, and rounded or right angle corners--we chose rounded to match what was already there. The screw holes pretty much lined up with the original ones and we had a relatively easy time lining up most of the doors when we reinstalled them.
This is what we started with when we first bought the house! Bi-fold pantry door off its hinges, lots of holes and damage in some of the doors, no handle on the closet door (just this deadbolt), and of course, honey oak doors and matching pine trim.


Now, after a few weeks of uninstalling, cleaning, sanding, priming, and painting, we have beautiful, clean, modern, fresh doors! You can totally do it, too, if your house is challenged in the crisp, updated trim department. Check out the detailed instructions below and let me know if you have questions in the comments!
Transform dated doors and trim with paint and hardware!
You will need:
- 180 grit sandpaper
- Tack cloth or damp cloth
- 1.5" angled brush
- 3/8" nap roller
- Zinsser 1-2-3 primer
- Benjamin Moore Advance paint (we used White (OC 151) in Semi-Gloss)
- Wood filler
- Knobs
- Hinges
- Door bumpers and/or hinge pins (we used both depending on the location and angle of the door)
Instructions:
1. Remove hinges and knobs from doors and trim. (If reusing, put aside and clean/replace stripped screws as needed.) Label doors with masking tape labels.

2. Wash the trim and doors, particularly around handle-height to remove any oils (so you don't sand them into the wood).
3. Fill any dents and holes with wood filler.


4. Once dry, lightly sand the trim and doors with fine (180 grit) sandpaper. Just a couple seconds per area is fine. (My friend helped!)


5. Dust the sanded areas off with tack cloth or damp cloth.


6. Prime trim using the brush and prime doors using the roller. Let dry several hours.

7. Flip doors to other side and prime, let dry. (We used empty paint buckets and various other objects as sawhorses since we had so many doors to do at once.) (I think dry time took about 8 hours but I left them for 24 most times.)
8. Paint trim using the brush and paint doors using the roller. Let dry.
9. Lightly sand doors to catch any high points; also sand any dried paint drips on trim and doors. Dust or wipe off dust. (I was really not excited about this step but particularly on the oak doors, the second sanding really helped smooth things out! Worth the time.)
10. Flip doors to other side and paint, let dry. Put second coat on trim.


11. Install hinges, stop pins or bumpers, and knobs. (I had never installed a doorknob before helping with my parents' rental earlier this year and wow, it's so easy! They come ready for standard doors so you mostly just pop them in and screw. It's kind of fun!)


Stand back and cheer!!! What a difference!


We also had a great experience getting project tips and shopping at Orchard Supply Hardware for the paint and hardware. I had to go back several times for more primer and paint, and they were always friendly and helpful. After some bad experiences at the bigger hardware stores during our fixer upper projects so far, I am really glad to have an Orchard Supply Hardware nearby where I know I can get customer service from someone who knows what they're doing and who will take the time to walk me to the aisle rather than giving me vague instructions or not acting concerned about my question. We're buddies with Dave and David (both in paint) and Craig at our local store and will definitely be back throughout our projects! Plus, OSH has Benjamin Moore paint, which I now know is the greatest.

No comments
Post a Comment