WELCOME

Hello! I'm Suzannah, a serious DIYer and mom of two little ones. Follow along with my DIY fixer upper house renovations, sewing and crafty projects, real food recipes, and de-stressing goals.
I believe you can love your home just the way it is, AND have the power to design and make big changes to make it better.
I'm also the author of DIY Wardrobe Makeovers!

7.31.2013

Another maxi dress--plaid and pretty

So I've been sharing lately how I'm super into maxi skirts and dresses--so comfy and versatile and great for warm weather when you don't want to wear too many heavy layers or anything tight. So I made this navy maxi dress the other week, and have worn it several times and really loved having something ladylike to put on when I'm a little hot and sweaty and lazy! So I've really been wanting to make another!

I'm a little low on big cuts of fabric right now, and you do need more yardage for a long dress than for my usual shorter ones, so I went to my mom's fabric stash. She has an entire bolt of this pink and grey plaid stuff that she got for free when her wholesaler messed up her order, and she doesn't ever plan to use it... I made a sweet sundress out of it last year, actually. But this one's totally different. ;) Free fabric!!

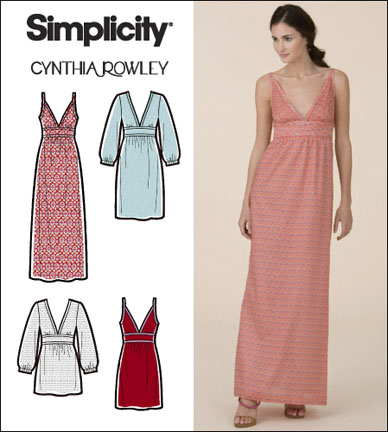
I have several patterns that lend themselves well to maxi dresses, including this one--Simplicity 2587. I made the top view from it once and it was waaaaaay too low-cut, and I could tell the dress would be, too. Didn't look like I'd be able to wear a bra with it, which could be good thing in the summer but not something I'm always comfortable with.

I did cut the bodice front pieces a little wider in the center front and allowed them to overlap a little. When it was done I tried it on, and I actually could wear a plunging bra with it, but then the straps show and all that. No biggie, but also... it's hot, who wants to worry about bra showage?

So I remembered an old trick from my early sewing days, when I was making lots of little summery halter sundresses and prancing around in them in Rainbow flipflops and other trendy 2005 things. I used these in dresses I made as well as a couple Target/American Apparel halter dresses so I didn't have to wear a strapless bra, or worry about showage.

The secret? BOOB PADS!!!

I still had some in one of my notions boxes. Pushup ones, I think! ;) I hand-sewed them into the dress once it was done, tacking them in place to the lining and through the outside layer for strength--in a matching thread color. Bet you can't even tell!

Well, maybe you could tell if you really tried... but hopefully you're not staring at my boobs too much. Maxi dresses FTW!
13 comments

7.29.2013

New hot pink bed pillows, and a styling dilemma

Okay, guys... so, I just made these pillows. Actually a couple weeks ago, I think, but I *forgot* to blog about them--oops. So glad I remembered to share them with you now! Also, I need your styling help!

I've had two very large Euro pillow inserts (like these, 26"x26") for ages, but had never made matching pillow covers for them. Then, not long ago, I bought a couple yards of amazing hot pink denim at JoAnn on clearance for super cheap, and while I loved it for the chair I'm reupholstering, I couldn't do that to my dear husband. Permanent pink furniture might be too much for him (and maybe me! What if I got tired of it after all that work?)

So I finally decided to freshen up the bedroom decor with some hot pink, and made these!

Love how they look with the ever-versatile tufted headboard I made!

But, I'm not used to having extra large throw pillows on the bed, and now I don't know what to do with all the other ones. We normally have four regular pillows with regular pillowcases and/or shams, and then a couple throw pillows. But adding these is just a few too many to set aside every night at bedtime (the chair is getting precariously stacked with pillows as it is.)

So, help me pick an arrangement of throw pillows incorporating the new ones!

Option 1: ALL the pillows. The four sleeping ones, plus the two toss pillows I've had on there lately, plus the new ones.

Option 2: I never know what order to put big pillows in. Maybe the large pink ones go behind?

Option 3: Bare bones, let the hot pink ones stand on their own. Plus the sleeping pillows.

Just got these two matching pillows at Goodwill, brand new--super fun tie dye look on the front and shimmery silver/beige on the back--shared on Instagram the other day. So Option 4 is the four sleeping pillows (turned sideways--aaah, another option!), the big hot pink pillows in front, and the new matching pillows.

I'm sure you can imagine endless additional options and pillow scenarios. As you can see, this is an extremely diffusion question. (#firstworldproblems, I know.)

But, it's always fun to move pillows around with friends and see what looks best, so I figured I'd ask you! Lend a hand, would you? What's your vote?
24 comments

7.24.2013

The classic baseball tee, but more flattering: a simple tutorial

This is a super fun summery tutorial that came out of nowhere last weekend. I bought one of those classic baseball tees at the sporting goods store a few weekends ago, and it's been sitting in my drawer since it wasn't very comfortable with the high neckline... definitely a little boy's large tee, not what I'm use to with more open necks and more room to move in with typical women's tees.

I love the classic baseball tee--they remind me of The Sandlot and Wet Hot American Summer and classic American summer activities that I never do, like walking in parades or going to carnivals or playing sports in the park... nevertheless, I have some kind of nostalgia for these things, and I've always liked the classics.

BTW, if you haven't seen Wet Hot American Summer and you like stupid and inappropriate comedies, Paul Rudd, Bradley Cooper, Amy Poehler, Elizabeth Banks, and a bunch of other people from 2002... you should check it out.

Of course, baseball tees have also been trendy back and forth recently. Trendy Sydney did a feature on three ways to wear one which included a pencil skirt--that's a little adventurous for me and my poly/cotton blend $7.99 tee, but I appreciate the idea.

But back to my problem. I had a basic navy and white baseball tee that choked my neck. But the facing was made differently than a basic short-sleeve cotton unisex tee, you know? Loosely ribbed neckline binding at the neck, sewn into one of the raglan arm sleeves. This gave me an idea.

So, I undertook the adventure of picking apart the tee, cutting down the neck, and sewing it back together with the original neckline. Watch and learn!!

Baseball Tee Neckline Makeover


You will need: A baseball tee.

1. Unpick the neckline of your tee, careful not to tear the fabric of the tee or binding.

2. Carefully cut down the neckline of the tee, the same amount all around. You may want to cut it down 1/2" or so then try it on, and cut down deeper in the front than you do in the back. You only have so much binding to go around, so you can't cut it down massively, but you could get an extra inch or more in the front especially if you don't open it up a ton on the back and sides.

3. Sew the binding edges back together, right sides together.

4. Press that seam allowance to one side, but don't press out the creases from the original folds of the binding. Clip the center front (the seam will be your new center back).

5. Matching centers, pin the binding right sides together with the tee neckline. I used the folded under part from the front as my tiny (3/8") seam allowance; originally, it was only topstitched with the double row, but to keep it in place as you stretch, you'll need to sew it down first, then topstitch.

6. Press the underside down, pin carefully in place, and topstitch all around the neckline. I did it from the top since my ribbed neckline was staying in place nicely and I knew I would catch it in the seam.

7. Optional--add a second row of stitching to mimic the original, which was done with a double needle and fancy factory machine. (Alternatively, if you have a wide double needle, just use that in the previous step!)

Ta-da!!!


Now, if only it were easy to take in the sides and give it a waist--but it doesn't have side seams.

Still, much more comfortable and wearable!!
5 comments

7.22.2013

Lots of double welting, and chair progress (part 2)

You may remember I'm currently in the middle of a Louis XV chair re-upholstery project. Yikes!! I have several big projects going on right now (sitting around the house halfway done... a little stressful!) but this chair is coming along the fastest. Had to share a few updates since I last posted about it, and get some advice!!

So, first I restored the base seat with the foam from the original, which was in great shape. I opted to put a layer of muslin over the top of it, since my new fabric isn't as thick as the old one.

Then I very carefully stretched the back piece on, and then added the original webbing reinforcement (not shown).

Then I put the original orange foam back in, and stapled the top layer over that.

Then I got tired and put the chair in the living room for a while (and Instagrammed it), where I decided it looked very good. Now I don't want to move it upstairs when it's done! I'll have to decide that later. For a while I just draped the excess fabric over the old seat cushion to make it a little more presentable (left). Still covered in staples and needed a new cushion cover... hard parts coming up!

So this weekend I knuckled down and recovered the cushion. I used the old one's fabric for a pattern and bought some thick cording to make the piping. (See the original here.) I haven't made covered buttons yet and am not sure if I will... again, I reused the foam and padding from the original, which had some covered button tufting. I probably should make some grey ones for the new upholstery... but at least it's usable now.

So, now I only have one major step left... attaching the double welt cording! (Step 4 in the tutorial I'm using, though I did it out of order.) Because yes, I just made 10 YARDS OF DOUBLE WELTING. It took a looooooong time. I definitely watched both Wedding Crashers and The Proposal yesterday. And some old SNL's on Hulu. Had some time finally and made all this cording!

I hadn't cut my bias tape quite wide enough so the first pass was super slow-going and tricky. The second row of piping was much easier, actually, and then I had just a little wedge to trim off. (See pics of how to do it here.)

Phew! OMG, that's a lot of piping.

So my question now is, do I need to go buy Magna-Tac, or can I use glue I already have here? Or, what's the best glue for this kind of upholstery use? I can't imagine glue being strong enough to hold it on, since the original had teeny tiny staples going through the middle of the welting.

Has anyone done this, and have any suggestions?
4 comments

7.19.2013

Pink and orange retro 60's sheath dress

The dets on the pink dress from our 1960's summery party that I shared earlier this week! I have had this fabric forever and love it soooo much, and have wrapped it around many pillow forms in multiple rooms trying to make it work, but never found the right combination. I even bought another yard or two of it at JoAnn when I saw it on the clearance rack again (it was super cheap both times), so I still have some left after this project, but I decided to make it into a dress at least! I do still hope it can be pillows or something someday. I love it so, it would be neat to see it every day in my home!

I wanted to make something bright, cheery, girly, and summery for my parents' 1960's "California Dreamin'" party, and I had this image in my head of bright print mini dresses, big plasticy sunlgasses, and ladies walking around cute downtown streets carrying wicker bags. In my mind, the dresses are simple a-line straight ones, short and bright and a little stiff!

I went to my pattern stash and pulled out McCall's M5799. I bought it ages ago (it appears to be out of print) and don't think I've ever used it... I wanted a basic, versatile sheath dress pattern, but I rarely make them because I don't usually find them very flattering! Can be pretty bust-minimizing, which is not something I look for in a dress. Or they can be too loose, especially from home sewing patterns (my gripes about that here and here). Instead of giving it a full lining, I went the quick way and created a self-fabric facing for the neck and arm holes. I interfaced it and it works well to support the openings.

I cut out the dress last Friday and sewed it over the course of two Pretty Little Liars episodes on Saturday morning. It went together fast, obviously!

Not as bad as I was afraid the fit might be! I'm glad I don't have to wear these all the time, but it's super fun for the party!

I went to How to Be a Retronaut to see if I could find pics of the summer 1960's vibe I was imagining, and I didn't find the perfect thing, but I did find this funny series! My new dress looks an awful lot like a summery, cotton version of these uniforms...
Source: How to Be A Retronaut

Guess I chose an appropriate colors!

How did people wear dresses that short all the time?!!? (Girl in the upper right has matching panty shorts underneath, but still... what a tough style to pull off!!!)

Anyway, that's the story of the pink dress. It was a hit!
10 comments

7.17.2013

Pretty backyard "California Dreamin" 1960's-ey party

I don't throw parties all that often, but I love to help other people with theirs. ;) My mom throws an annual "July birthday party" for herself and all the other July birthday people we know (my husband's is July 4th, for one). It's a great occasion to see family and friends in the busy summertime--and they're the same crowd we also see at my parents' annual New Year's Day brunch open house, so very cool to stay in touch at least twice a year with some very cool people my parents know.

My mom gives the party a different theme each year, and I help come up with the decor, and make myself a new dress! So now that I've been blogging a while, I actually have a few posts about previous years, too!

  • In 2010, we did "Oregon's Bounty".
  • In 2011, I don't remember what happened. ;) I was planning a wedding; I guess I was busy.
  • In 2012, we did "All American Summer"--lots of red, white, and blue and classic gingham!

This year's theme was "California Dreamin." We played Beach Boys Pandora, grilled burgers, played some volleyball and badminton, and wore sheath dresses. Kept the decor simple and relaxed, and added a fun occasion to dress a little retro.

The image in my head for the theme was the first 10 minutes of Almost Famous--San Diego, 1968 I think. OMG, I love that movie. (Design*Sponge knows what I'm talking about--they did a "Living In" post for it!)
Design*Sponge

So, without filling this post with pictures of my parents' friends, lovely as they are, here are a few peaceful 60's-inspired scenes from the party!

Fun, on-theme party activities!

My dad is a hat-wearer.

Classic plastic cups, right?

I told my husband to tuck his shirt in and wear his preppiest shorts to get a more 60's look. Better than long cargos!

He often finds himself a comfortable spot to be at these kinds of things. ;) I loooove my parents' hammock.

Who doesn't love summer backyard parties?

5 comments

7.15.2013

Little white dress update: Longer, and... better?

Lemme tell you the inside story. Different things happen after I blog about something I've made.
  • Sometimes I wear it several times the next few weeks, and love it and Instagram it (hashtag #howtowearDIY! Join the party!)... 
  • Sometimes I hang it in the back of my closet and wait for a party or occasion to wear it... 
  • Sometimes I try it on a few times and realize I need to fix something on it before I can feel good in it. 
This is a case of the latter. Particularly.... remember the little white dress I made recently, out of cotton eyelet lace interspersed with white pique (worn here). Super cute, inspired by a pin from one of my fave bloggers, and I looooove white dresses--always have. 

But it was too short. I gave it a big hem at the last minute because I thought it was too long, but then it felt dowdy, so I turned it up again. I seriously was doing this right before packing it for our mini vacay and I wanted to pack it! So, insufficient trying-on-while-sewing was going on, and the length did not work out.

So luckily the job of letting the hem out wasn't too hard. I easily made it 2-3" longer by taking out the hem I had sewn in quickly. Voila!

It's not a very full skirt, so I guess it felt a little plain and not pretty enough with the longer length--the shortness and extra stiffness at the hem made it feel fuller. But, this is definitely still better! (If I hadn't had as much room, I could have made it a teensy bit longer by putting in a tiny hem or adding a hem facing, so only using up 1/2" or so at the bottom edge.)

Longer and more versatile, right?

Aside from adding some tall heels or wedges, how should I make it a little more girly? What are your outfit ideas for a basic, solid fit-and-flare dress?
19 comments

7.12.2013

If you were wondering... a day of simple Paleo meals

Food time! For those of you who are interested. (If you're not, skip this one. ;) ) I've been talking about food more lately, now that I'm happy with my diet and am proud to share it with you. (My raw vegan-to-Paleo transition here.) Some of you have asked about the kinds of things I eat every day, for snacks, for breakfast... I'm happy to share some of what we've found works for our budget and tolerances on a nutrient dense, whole foods, Paleo diet.

So how about some photos?

Years ago I was so impressed by Angela Hardison's gorgeous photos of her meals as part of an effort to eat at least 50% raw foods. I don't have nearly as good a light box set up (or as much Arizona sunlight) as she apparently does (oh, food photography is hard!!), but I tried to show you in simple photos what I often eat on a typical day.

I took these on a weekend day a couple weekends ago: breakfast, lunch, and dinner.

Breakfast


  • Poached eggs
  • Steamed spinach
  • Nitrite-free bacon ends & pieces
  • Bulletproof Coffee (I add some cinnamon sometimes, like in this pic)


Lunch


Dinner


  • Ropa Vieja from The Paleo Slow Cooker (see my review here, even a picture of the page!)
  • Homemade guacamole. Currently have 8 avocados and this is reminding me we need to eat them!!


Snacks:


Not pictured: I sometimes snack on raw cashews (buy them for $2.77/lb in the bulk foods at Winco), coconut oil, 85% dark chocolate, and homemade almond butter. But, now that I eat plenty of FAT at each meal, I'm not hungry between meals and can go hours without the blood sugar swings I used to have all the time on my old high carb raw vegan diet. So I don't need to snack much.

Veggies, protein, and fat...


I try to eat veggies with every meal, but sometimes I'm low on time so I like one-dish meals like stews that have veggies in them already. Loving our CSA this summer with tons of veggies each week and pressure to use them before the next one! ;) We also grow salad lettuces on our porch.

I really enjoy all our meals when we put some effort into them. Like those above--but that's a common weekend day! On the weekdays, I try to make sure we have left overs for lunches.

For breakfast on weekdays, sometimes I just have Bulletproof Coffee (low-toxin coffee blended with butter and MCT oil), which keeps me totally satisfied and full of energy till about 2PM (shocking for me, used to have to protein/fruit breakfasts and be starving at lunch! Needed the fat!). This "Bulletproof intermittent fasting" sounded completely insane to me until my husband got into it and felt good. I tried it and am a convert. Recent post on fueling your morning here on one of our favorite researcher's sites. Amazing how my hubby has lost 35 pounds of fat and gained muscle by eating more healthy fat!

This is so fun!!


I love learning new recipes for meat (cooked a whole chicken the other weekend and was SO proud of myself!!!!), and we get a chance to since we buy cow shares from a local grassfed beef farm and never know exactly what we're going to get. (More on my husband's blog Grassfed Geek about that.) I feel so grateful and positive about this nourishing diet we've adopted, and so glad he introduced me to it! I love the delish meals we've been cooking, and have no cravings like I used to. It all works for me. =)

13 comments

7.11.2013

What to wear to a picnic... a DIYer version

Summer, picnicking, and DIYs!


I can’t believe it’s full-on summer already. I live for this time of year so it feels too good to be true!, but also it’s crazy busy and there’s SO much going on it can become stressful. Let’s hope that doesn’t happen only the second week into July… ;)

One fun thing happening this summer is the Portland Family Bloggers Picnic (July 28, if you’re a local blogger!), a free event at one of Portland’s awesome parks and a chance for us bloggers to hang out, potluck picnic on the grass, and meet everyone’s spouses and kids. We’ve done this kind of event before and it’s so fun and relaxed.

DIYs to rock at a picnic


But okay, the main purpose of this post is for you DIY fashion fans out there… per request (of another Portland blogger, actually!), let’s talk about some great summer DIY projects perfect for a picnic!!

For me, that means… 
  • Easy. Not too much sewing or planning involved. I’m busy, man!
  • Also, summery. I LOVE the time of year when you can wear shorts and a t-shirt outside and be warm enough!
  • Also, day time-ey and a little classic. Thinking blue and white gingham… (like my so-called “picnic dress” of last year!)
The DIY attitude is, you've got to display something you made yourself rather than recycling and curating entirely storebought content. Originality, baby!! That's what's fun about this whole DIY movement and learning to sew and be crafty, right? ;)

So here are some of my fave ideas for DIYs to wear to a picnic this summer!
Source
Have you tried any of these? Picnicking classics...

Fedora! DIY a cool band?
Source
Source
The tie waist shirt (perfect button shirt makeover! I included one kind of like these in my book!)...
Source
The perfect DIY cutoffs (I made these a few months ago, and these last summer, but these below are my faves...)
My cuffed cutoff jean shorts tutorial

And some casual accessories, like a DIY rope bracelet or other camp-ey, carefree jewelry piece? (I wish I made more jewelry... I hardly ever do, though! Need to have a crafty party time and make a bunch at once!)
Source
Source

Woohoo!! Ready for the Portland Bloggers picnic, if you're a local blogger? Or, ready for any summer picnics you're planning yourself?!

P.S. I also have to shout out to sponsors of the last Portland Bloggers event. (I’m an organizer of the group and we are so grateful for our sponsors’ support! Thanks, everyone! Check them out if you haven’t yet!)

9 comments

Search

© Create / Enjoy • Theme by Maira G.