

How to replace a fluorescent light with an LED flush mount - kitchen update tutorial!
The more recent trend in kitchen lighting has been a series of recessed lights spaced throughout the kitchen. This would be great in our space and I talked to a couple of electricians about it; the work is relatively expensive and then you're left with drywall damage (since our kitchen is below another floor so it can't be accessed from above). Maybe someday we'll be down for that but I have had enough drywall repair for quite some time (after all the patching we did) and we have lots of other places to spend our money right now, so I looked for easier and cheaper solutions. We had no idea what we'd find under the fluorescent fixture--I'll show you below!
I have seen some nice sort of hybrid chandelier/flush mount lighting in kitchens that would give off a lot of light (like this fabulous one), but we have pretty low ceilings and I didn't want to take up too much space. Also it turns out the electrical box was off-center, so a statement fixture there would have looked pretty silly.
So we found this low profile LED fixture online. Less than $30, lasts forever, medium-cool light tone, easy to install (doesn't even have screw-on caps for the wires!).
How to Replace a Fluorescent with a Flush Mount
You will need:
- Drill/screw bits
- Spackle with primer
- Putty knife
- Ceiling paint & paint brush
- Flush mount light (we used this one)

Instructions:
1. Shut off the power to the light fixture at the panel.
2. Remove the plastic cover (ours had old paint on it! And so much dust and lots of dead bugs). Remove light bulbs.
3. Remove metal middle strip to expose wires and power box.


4. Remove all screws holding the fixture up to the ceiling and detach the wires from the wires in the ceiling.

Ours was clamped into the fixture at that metal piece where the cords branch apart, so we had to use pliers to put it into a rounder shape to fit through the hole in the fixture.

You will be left with at least one big hole!

5. Patch any holes in the ceiling with spackle. I like this one since you can just paint right over it, no primer needed.


6. Paint the ceiling where the fixture was to match the rest of the ceiling (if needed). We let ours dry overnight.
7. Install base element of the flush mount fixture. The LED one we chose had a lightweight plastic one, but as you can see in the photos above the box under the fluorescent fixture was pretty standard and you could use any standard light fixture with the metal plate. (What a relief that was to find out!)
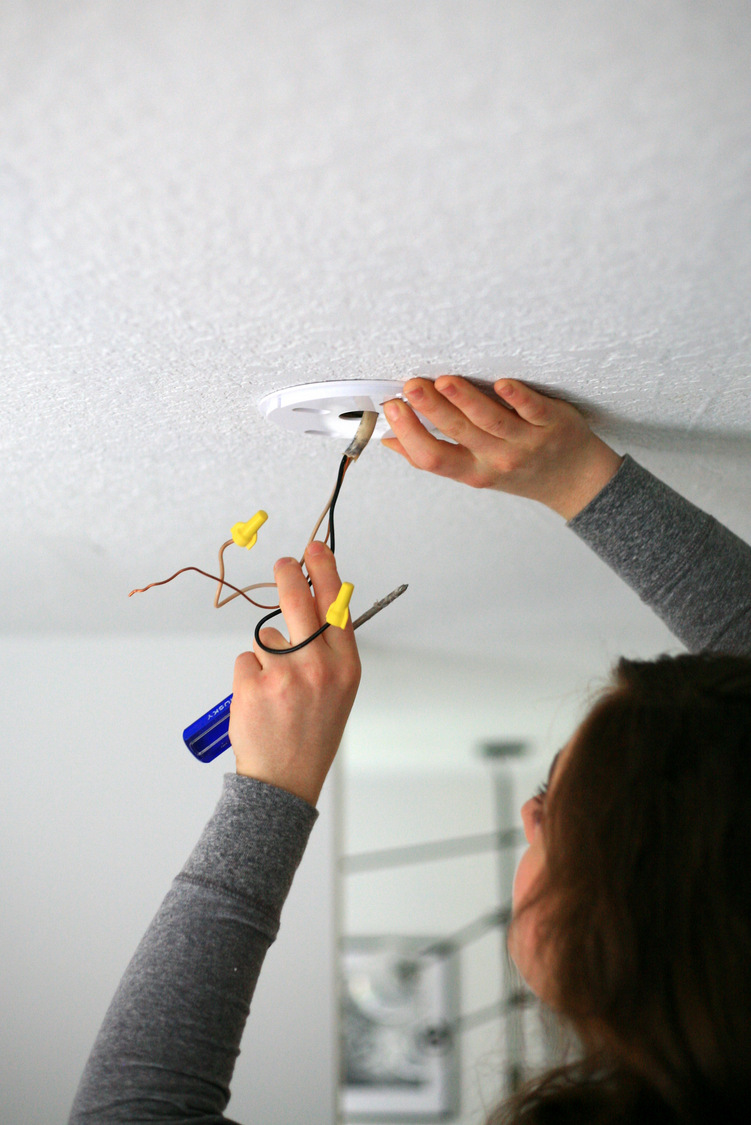
8. Connect the fixture's wires to the house (this LED fixture has clamps rather than using the screw caps), tuck up inside, and attach the rest of the light! This one just screwed on once. (This fixture is plastic and doesn't use bulbs, just has the LEDs inside.)

WHAT a difference!!!

The fixture actually gives off almost enough light for the kitchen by itself but we've found we do usually want to turn on our light over the sink, which adds more light and distributes it around the kitchen.
Again this fixture is off-center, so maybe someday we'll add another one a few feet down or replace it with distributed can lights, but for now it was a $30 solution and absolutely perfect for what we needed!

No comments
Post a Comment