

DIY upholstered & slipcovered bed tutorial

This post contains affiliate links.
I honestly never thought I would do something like build a BED from scratch. It sounded like the kind of project that would be a lot of work, kind of expensive as DIY home decor projects go, and maybe not end up being that nice. Plus, it has to be very functional too, and support a lot of weight! But then (as I shared in episode 48 of the Your Home Story podcast), I just couldn't find the bed I wanted online in my budget. I was fully intending to purchase one of the many upholstered headboard + rails combo platform beds available online, in a grey linen look fabric. But I wanted something relatively plain (no tufting, nailhead trim, etc.) and the plain ones I found were all super cheap-looking.
The look I was after was the slipcovered bed you see in rooms by Amber Interiors and other high-end designers. I suspect they are often this Restoration Hardware bed, or this Serena & Lily one. Here are some inspirations so you can get an idea of the look I was going for--slipcovered, not just upholstered.
 |
| Source |
 |
| Source |
 |
| Source |
 |
| Source |
Nice, right? I love the footboard look but Jason is anti-footboard cause he likes to untuck the blankets on his side, so I planned to just do a headboard and platform. You could definitely modify this tutorial to have a footboard as well, and to do a deeper headboard/footboard than just the padded plywood we did.
I didn't think I'd find a DIY for exactly what I wanted, but I looked around online and found this thorough tutorial for an upholstered bed (that is, headboard and rails upholstered, mattress inset slightly, feet showing). It was a very helpful tutorial and we used it almost exactly for the base! There are some construction differences when you add the bedskirt part (mattress is not inset on ours, for example) but major props to that blog for sharing such good info on the whole process!
I encourage you to visit that project as well if you get stuck on any of the steps, but I will share the whole process that we did exactly here. Here goes!
DIY upholstered & slipcovered bed tutorial
You Will Need (for a Queen size):
- One sheet of 1/2″ thick plywood (for the headboard)
- One sheet of 3/4″ thick plywood (for the platform)
- 12 1x4" boards (for the bed slats/crossboards) at least 5' long
- One 3x3″ post about 6′ long (for the legs)
- 4 boards that are 1″ x 2″ x 8′ (for the cross boards/slat supports)
- 2 2″ x 4″ stud (center crossboard support and fifth leg)
- Pnuematic staple gun
- 1/2" staples
- 1-3/4" long construction screws
- 1.5" long construction screws
- 6 at least 2" long bolts with nuts and washers
- 5 yards of slipcover fabric (I used this 54" wide linen)
- 6 yards of coordinating quilter's cotton or flannel (I used this 42" wide flannel cause the color was closest to my linen)
- 1/4 yard fusible interfacing
- 5 yards of muslin (I used this 36" wide one)
- 9 yards of 10 oz batting (for a double layer) (I used this 48" wide one)
Part 1: Design
First, determine the size you want the headboard to be and the height for the frame. I was copying this Serena & Lily bed, which is 51" high at the tallest part of the headboard (but read on, you'll see that I changed it up later).
Most queen size headboards are 64-68" wide, I'd say after researching, though a queen mattress is only 60" wide. As you can see in our room, the headboard goes right to the outer edge of the window trim. I made it only 62" wide to fit our space.
Here are the dimensions of my inspiration bed.

With nightstands in place, I measured and I did have the 67" width with comfortable nightstand placement--but, that would have made the headboard cover up one whole side of the window trim. Rather than keep those extra inches for grandeur, I opted to make our headboard smaller (62"), giving about 1/4" on either side of the bed frame (61.5") but making it line up perfectly with the outside of the window trim rather than overlap.


So the first step is measuring your space! In a room without asymmetrical windows, I suggest making your queen size headboard closer to 67" to make it look a little grander.
A GREAT thing about building your own bed is you can make it the perfect height for your nightstands! (About the same height.) It is usually fine to have the bed up to 4-5" lower than the top of the nightstand, but I wanted it flush at 26". With our 10" high mattress, that meant the frame needed to be 16" high at the top.

Part 2: Assembling the Platform
We used the same dimensions for the frame from the tutorial:
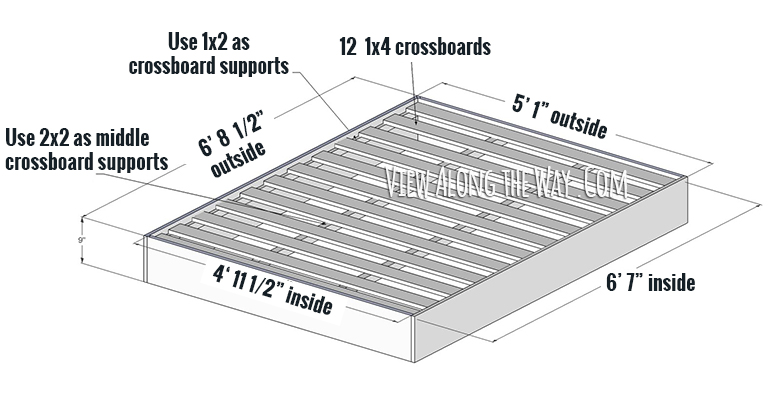
Here is a handy table with cutting instructions also from the platform part of that tutorial.

The first step was cutting that sheet of 3/4″ thick plywood into four 9" tall pieces, one for each side. My dad and I marked out 9", 18", and so on down the sheet (at several places from end to end), traced with a straight edge, and cut.


Then we cut two of the 9" tall pieces to 59.5" and two to 80.5".
Then we screwed them together, using 1-3/4" long construction screws.

We also installed the side crossboard supports, and here's one place we differed from the tutorial: if you make an upholstered bed frame, like they did, your mattress will be inset 2" from the top. This will hide the crossboards and keep your mattress totally in place. But since I knew I'd be putting a skirt over our side rails and crossboards, I didn't want the mattress to sink deeper than the edge of the side rails and pucker (and shorten) the skirt.
So, install your crossboard supports (just two, one on each side), 3/4" lower than the top of the rails (for the thickness of the crossboards). Use 1.5" screws (right length for 1" deep support plus 3/4" thick side rail), about every 6". Provides lots of support!

Also screw in your center support beam, 3/4" below the top.

Now, cut the legs. This is also different than the original tutorial since their legs showed and had to look nice. These don't. We made our own pretty roughly. First we planed down a larger post to 3"x3" and cut it into four 11-3/4" long legs (in order to make the platform 16" high) (adjust as needed for your desired height).

Then, due to screw availability (and already having visited 3 hardware stores that weekend), we drilled into the posts where our screws would go so we could use the 1-3/4" long screws and counter-sink them. Turns out we could have just screwed them from the outside, but we didn't know that at the time. You don't have to do this counter-sinking step even if your screws are shorter than the total distance from leg mostly through 3/4" thick plywood.
We cut four legs, plus two 2"x4"s for the center support--more on that later. (We also varied from the original tutorial by only using one center crossboard support, but adding a fifth leg to support it.

We hammered in scratch protection feet, two to each leg. Those have been super helpful moving the bed around on our rug in the room!!

This is also a dry run picture, but now you can glue and screw in your legs. You will also have the center support already installed at this point.

We used construction adhesive as well as the screws.

Cut down one of the 2"x4"s for the center leg so it can stagger and brace underneath the center crossboard support.

This photo looks out of order because in these photos the sides are already padded... ignore that part. We did it wrong because I thought the fabric was going to wrap around the top edge. You can glue and screw in the legs before you put the fabric/batting on, which means you don't have to counter-sink the screws and can use reasonable length ones.

Now cut 12 of the 1"x4" crossboards, 4'11.5" long. We did a dry run of the crossboards cause it was exciting to see it looking like a bed already--but don't screw them down yet!

Cut your 1/2" plywood to desired size, as you figured out in part 1. For us that was only 62" wide.

As I will discuss later... I recommend that the headboard be the full height of the finished bed/headboard, as well. That is, it will sit on the floor with the legs rather than being propped up and supported by the 9" high back rail. This is also different than an upholstered bed where you could see the side rails and open space below. Trust me, it's better this way for a slipcovered, solid-looking headboard and bed. This means your headboard must be shorter than your upholstery fabric is narrow. I used this 54" wide linen which means the tallest my headboard could be, with 1/2" seam allowances and a 1" hem, without piecing, is 52"... but that's cutting it really close. I recommend you make yours at least 3" shorter than the width of your fabric.

Part 3: Upholstering the Frame
Cut enough 9" wide strips of batting (I used this stuff) to wrap around the side rails twice. For this queen-sized bed, that's 444" or 12.3 yards. It's okay if it's in chunks. Use the same straight edge method.


Temporarily attach it to the side rails with masking tape. It just has to hold long enough for you to staple the fabric over it.


Cut/tear a piece of muslin longer and wider than your headboard, by about 2" on all sides of the batting. (If your batting is wider than your muslin, you will need to piece it as I did below.)

Cut/tear the rest of your muslin into 12" wide strips (to cover the (9" tall rails plus batting thickness and room for fold-over).

Sew the short ends of the 12" rail cover pieces together so you have one long 12" wide piece--it needs to be 222" (plus 2" or so fold-over), or 6.2 yards long to wrap around the rails.

Press seams open.

Now wrap your 12" wide piece around the padded/taped side rails and fold over the top edge. Using a super powerful staple gun (we used an air compressor and pneumatic staple gun), staple every few inches.


Flip the whole operation over and fold and staple the other side. Remove the tape!

For the headboard, make a batting sandwich and put the muslin down on the ground first. Center the batting, then line up the headboard with the top and sides of the batting and staple the outer three sides down.

Then flip it over, fold under the bottom edge, and staple.

Part 4: Attaching Headboard to Frame and then Oops, Making the Whole Thing Shorter
I'll share the steps we used to attach the headboard to the rails this first pass--they're pretty similar to what we did when we re-did this part and made the headboard shorter.
Center the headboard on the platform back. This was easy for us cause our headboard was only 62" wide, so only about 1" lower than the padded rails and we just had to push down on the rail a little to line it up. If your headboard is more like 67" wide (and you do it this way instead of headboard all the way to the ground like we did when we redid it), you may want to use some boards or risers under the rails to bring it up to about the right (sideways) height).

Holding the headboard perfectly centered, we drew a few straight lines to line up again as we drilled the bolt holes.

Then, we drilled six staggered holes in the platform rail and, holding the headboard in place, marked holes in it that lined up.

Then position/hold up headboard and bolt together with platform to make sure you like it!


This is the same step you'll do if you have your headboard come all the way to the ground as we did later and I recommend--but it will be easier that way! More on that soon...
Now you can screw in all but the top (closest to the headboard) slats. (Trust me.) I didn't measure the gaps between mine; just distributed 6 on the bottom half an 6 on the top half and spread them out about evenly.


Alright, so at this point in the project I looked at our headboard and thought...... that's tall. I also realized I would need to piece the slipcover for the headboard since my fabric was only 54" wide. And, I went to order art for above our bed and... unless I chose a long, skinny piece, I would have to hang something really high!


But hey, this is a custom product! So we brought the headboard back out to the garage and cut it down! This time I wanted it to be 43" high based on the proportions of the art I chose and where I wanted to hang it--but I wanted the headboard to come all the way to the floor. So we cut off a few inches.

When you do this right the first time, you'll cut your headboard batting layers and muslin to stop at the top of the rail--16" in my case.

I stapled again.

Now, back to that step above where you center the headboard on the platform and trace your six drilled holes through the platform to the headboard so they line up. Then drill the holes on the headboard.

Part 5: Making the Headboard Slipcover
Now the sewing! I used linen and an almost-matching cotton flannel for the headboard backing and bed skirt top--rather than use all linen which was much more expensive per yard. I also used 1/2" seam allowances for all of this sewing.
First, pre-wash your linen and backing.
Next, I recommend cutting and then tearing to get a perfectly straight edge on the end of your yardage.

Cut/tear your headboard front: 46" tall/wide by 65" long.
For the backing, unless your backing fabric is the same width you may have to piece it. Cut/piece so your backing is also 46" by 65" long.
Sew right sides together.
Press under 1/2" at the bottom.

Press under another 1.5" and hem. [No photo, sorry.]
Snip corners (stagger--you can generally snip more on the backing) before you do the final turn right side out.

Now make a sort of (inside-out) French seam with a 1" seam allowance on the outside. I debated the side of the fin created with this inside-out French seam look and any larger would be too floppy, but a whole lot smaller wouldn't show up as much. A thicker, stiffer fabric can handle 1" or a little more, but a thinner fabric will need some interfacing, starch, or other support if it's more than 5/8", I'd guess.
You just made basically a pillowcase for the headboard. Now you can go slide it on--it will be a tight fit!

Now you can attach the platform to the slipcovered headboard. At this point my headboard was in its final configuration sitting on the floor, about flush with the bottom of the legs.
Get the slipcover perfectly in position (mine rises up a little in the middle but is all the way on and looks good everywhere else) and find the holes you drilled in the headboard. Poke through those with an awl or little snips. (On the outer and backing fabrics.)

Poke the bolts through, line up the platform, and bolt/washer/nut in!


Now you can screw that final slat down!

Part 6: Making the Bedskirt
Cut/tear your rail skirt pieces from your outer fabric:
- Two ~18" high x 84" long pieces
- One ~18" high x 64.5" long piece
- Two ~17-3/4" high x 20.5" long pieces
Also cut:
- Six ~15" tall x 1.5" wide strips of fusible interfacing
- Two 62.5" wide pieces of backing fabric--you can choose to center the seam or do what I did, one 44" tall (full width of my flannel) and one 38.5" tall
The reason I noted approximately (~) 18" on those is you have some flexibility on the depth of the hem--a little smaller than 18" and I could still have made it end up the right length and look good. I was able to use my 54" wide fabric most efficiently by cutting it into thirds which were each 18", and I did a 2.5" hem and 1/2" seam allowance at the top to make my bedskirt 15", so 1" shorter than the bed for a nice gentle float above the floor (and room for gravity to stretch the fabric down a little over time).
Cut/tear all of the pieces listed above. Here I am measuring out my 18" thirds of the fabric width.

Tip: fold each rail piece in half and notch to mark the center at the top (the part that will attach to the platform cover).


Next, press under 1/2" and then a 2.5" hem on the short sides of the two ~17-3/4" high x 20.5" long pieces and pin.

Now blind hem stitch the sides. (You also could hand-hem). If you're not familiar with this stitch, check out this tutorial or this video.


Next, on those same two ~17-3/4" high x 20.5" long pieces, zigzag or serge to roughly finish the edges (on the short sides).

On the sides of the three 18' long pieces (which you have not hemmed yet), press under 1/2" then 1.5"

Insert the interfacing strips, lined up with the top--leaving 3" at the bottom. Press to fuse the interfacing.


Now do a LOT of blind hem stitch--around the bottoms of on all three 18" long pieces.
Now, assemble the two corners of the bedskirt--the bottom of the bed, which will have a faux pleat look. Line up the center of each 17-5/8" long piece with the join of the short and long side skirt pieces. Pin.
Make sure they are lined up at the bottom so no part of the 17-5/8" long pieces sticks out at the bottom. (You may have to trim off a little at the top.)

Sew with 3/8" seam to hold faux pleat pieces together.

Piece together the top of the bedskirt. I used one 44" tall (full width of my flannel) and one 38.5" tall piece, both 62.5" wide. Pin right sides together, sew, press seam open.

Now combine the bedskirt and top. Pin right sides together.
At the corners, leave room for your 1/2" seam allowance to turn the corner and be even on both sides. It can be tricky, so I recommend pinning these parts first, and then the sides.


Sew skirt to top, with backing (my flannel) on top so you can pivot more easily at those tricky corners.

Snip corners and press seams open.


Done! Deep breath!! What a project!


I'm very happy with how the faux pleat corners turned out!

And the headboard! It's plain but not boring, if that's possible. I love it.


By the way, the cost worked out to $117.26 in lumber, screws, etc. and $91.13 for fabric. Total $208.39. Yes, you can buy an upholstered grey bed or headboard for $200 somewhere, probably... but it would be nowhere near as nice!!
SO happy I decided to make instead of buy, and love how this bed looks in our new bedroom!!

I'd love if you'd pin this tutorial for later to spread the word!

No comments
Post a Comment