

Amazing vintage chair makeover tutorial - With Heart!
So while I'm on vacation in Florida, let Jenn amaze you with this chair makeover project!

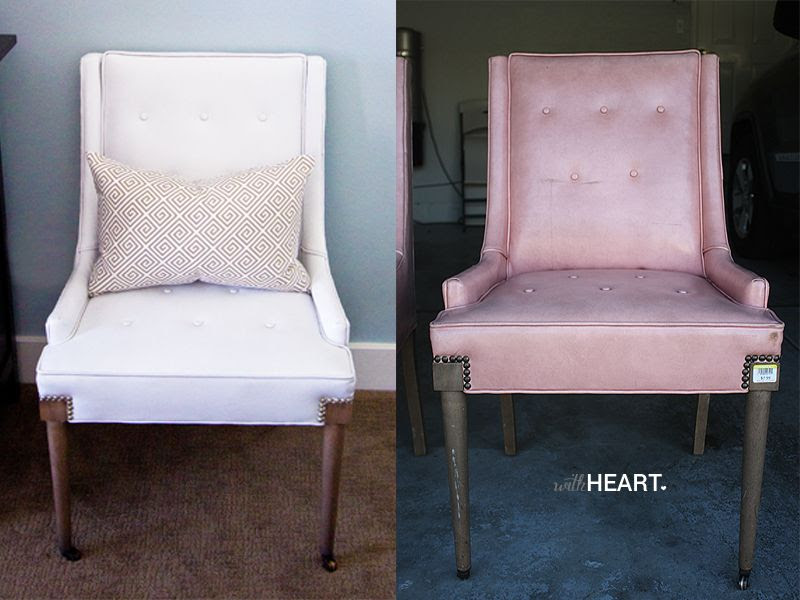
A few weeks ago, I was wandering through Goodwill when out of the corner of my eye, I spotted them-- a pretty pair of pink chairs. I practically sprinted over to them before anyone else snagged them, and flagged down an associate. You have to move fast in the shark-infested waters of a good thrift store, I tell ya. And swiftly swim I did.

The price: $7.99 a chair. For real? I was sold, even before I started surveying how much work they needed. I just loved the shape and the nailhead trim. And the color was so cute, it was love at first sight.

But these chairs were what my 7th grade self would call a "Monet" (I was all into Clueless, you know). The girls were good from far, but far from good. The vinyl was damaged a bit, and they were dirty. In fact dirty doesn't even begin to describe the level of filth. Someone had left the poor things outside for who knows how long. There were rocks and leaves and gunk all up in her crevasses. And the vinyl was stained.


I briefly considered reupholstering, but then I remembered I had seen this spray painted vinyl chair re-do and I thought why not? If they turned out horribly, I was out $14 and some shattered dreams of all they could be, and I could always go back to the reupholstery idea. I was going to spray paint vinyl chairs.
There was a death-row protest on Instagram to save the pink, and you guys, I wanted to have mercy and pardon the pink, but I knew it had to go. I scrubbed and scrubbed and scrubbed with Krud Kutter, but the original vinyl couldn't be saved. The thought of Ruby climbing all over them with decades of germs gave me the heebie-jeebies. My first instinct went to white. I wanted them to resemble these beauties:

Design Sponge

Amazon

Pinterest
After making sure they were good and clean, I gave the legs a good sanding and taped them off. I tried to figure some way around painting the nailhead trim, but I knew it was inevitable. I had an idea to paint it after the fact, which I'll show you in just a minute. But I digress....

After the legs were good and taped, I moved them onto the grass with some plastic bags underneath. I used Rustoleum 2X white spray paint. You can get vinyl spray paint, but my hardware store didn't carry it, and I was with a sleepy toddler who was a ticking time bomb so I chose to get a paint that adheres to plastic. Vinyl is plastic, after all.
I painted one coat in gloss, and knew I needed to go flat. It was looking too plasticky for the style.

I did two more coats in flat and they were looking so fresh and so clean, clean.

With so many nooks and crannies, I had to really go slow with the paint, move around to get in every crack, and do a lot of repetition. If you get too aggressive with the paint, it can pool and drip, which is no bueno.

After three coats of paint and a good drying overnight, it was time to tackle the legs. I used one of my favorite stains: Minwax in Classic Gray.

It's not too woody, not too oak, not to dark, just a great modern neutral. I wiped it on with a cloth, left it on each leg until I had done all 8, then went in the same order and wiped it all off. It was the perfect shade.

Next, it was time to salvage the trim. I bought Rustoleum Hammered spray paint in Rosemary. I picked up some super cheap thin painters' brushes, and sprayed the paint into plastic cup. Now, let me save you some heartache and profanity: I didn't realize this at the time, but this spray paint eats away at plastic cups like it's acid. I discovered this by feeling a drip after the bottom of the cup had disinigrated and the paint was seeping through. Onto my carpet. Because I had come inside rather than freeze my buns off. That's where the profanity came in. After I switched to a paper cup, I didn't have any problems, except for frantically cleaning up a paint dribble. Grumble grumble grumble.

Painting the trim took simply a steady hand and some patience. But, it was worth it. I think it truly does look like it could be the original trim, sans paint. Success!

After everything was dry, I wiped them gently with an old tshirt to get any excess paint off and soften them a little and it worked great. They don't feel stiff like I thought they might from the paint. They just feel like new chairs. It's amazing.
Pretty photos by James Young (can you spot him in the screen reflection?;)


Pillows: Caitlin Wilson
They are wearing really, really well. Not a bit of cracking. I would advise against getting them really wet, however. It can make the paint gum up a little.
These babies currently reside in my bedroom (we are almost done remodeling! Remember the board and batten wall and the DIY headboard? It's all coming together! Can't wait to show you more this week.), but I'm contemplating moving them to my dining table as captains' chairs. A total of $35 for the chairs, the paint, cheap-o brushes, and I have myself a pair of pretty white chairs.
Now, I can't help myself but look for vinyl chairs every where I go. There are so many that need good homes, and a fresh coat of paint.
So, what do you think? Would you dare to paint a vinyl chair?
OMG, Jenn, I'm totally sold on this one. You took the important steps and made a beautiful, lasting project! Yes, I think I would dare to try this at home!!
Thanks so much to Jenn for sharing this awesome project while I'm traveling in the sun, and thanks too for the sweet interview she did with me on her blog!
I am so in love and need chairs just like this for my living room! Bravo! This project could have went really bad, but it looks so great!
ReplyDeleteDang - I didn't know you could spray paint a vinyl chair! That's an amazing transformation! :)
ReplyDeleteHi, I love you dress and I was wondering, did you measure how much tulle to gather to the bodice panels or just kind of wing it? I am looking to do something similar with chiffon and I was wondering how big the pieces should be before I gather them. Hope that makes sense!
ReplyDeleteall I can say is WOW!
ReplyDeletethat really is amazing!!! they look so pretty! who knew you could spray paint vinyl!
ReplyDeleteThis looks so sweet! Although it is sad the pink had to go, I understand the heebie jeebies of who knows what is embedded on that... that said you still kept all the charm and character, what a steal at 7.99 and a little crafting!
ReplyDeleteSuch gusto! Such energy!
ReplyDeleteWow! Looks amazing! How many hours did this project take you to complete? The detail is great…I lack patience and just want to get things done and often cut corners or don’t take on projects due to their intensity.
ReplyDeleteBest BeefJerky, visit website
Today Wedding planning is very important for good ceremony
ReplyDeletewedding cake