

As requested: DIY J.Crew Tissue Flutter Tank tutorial


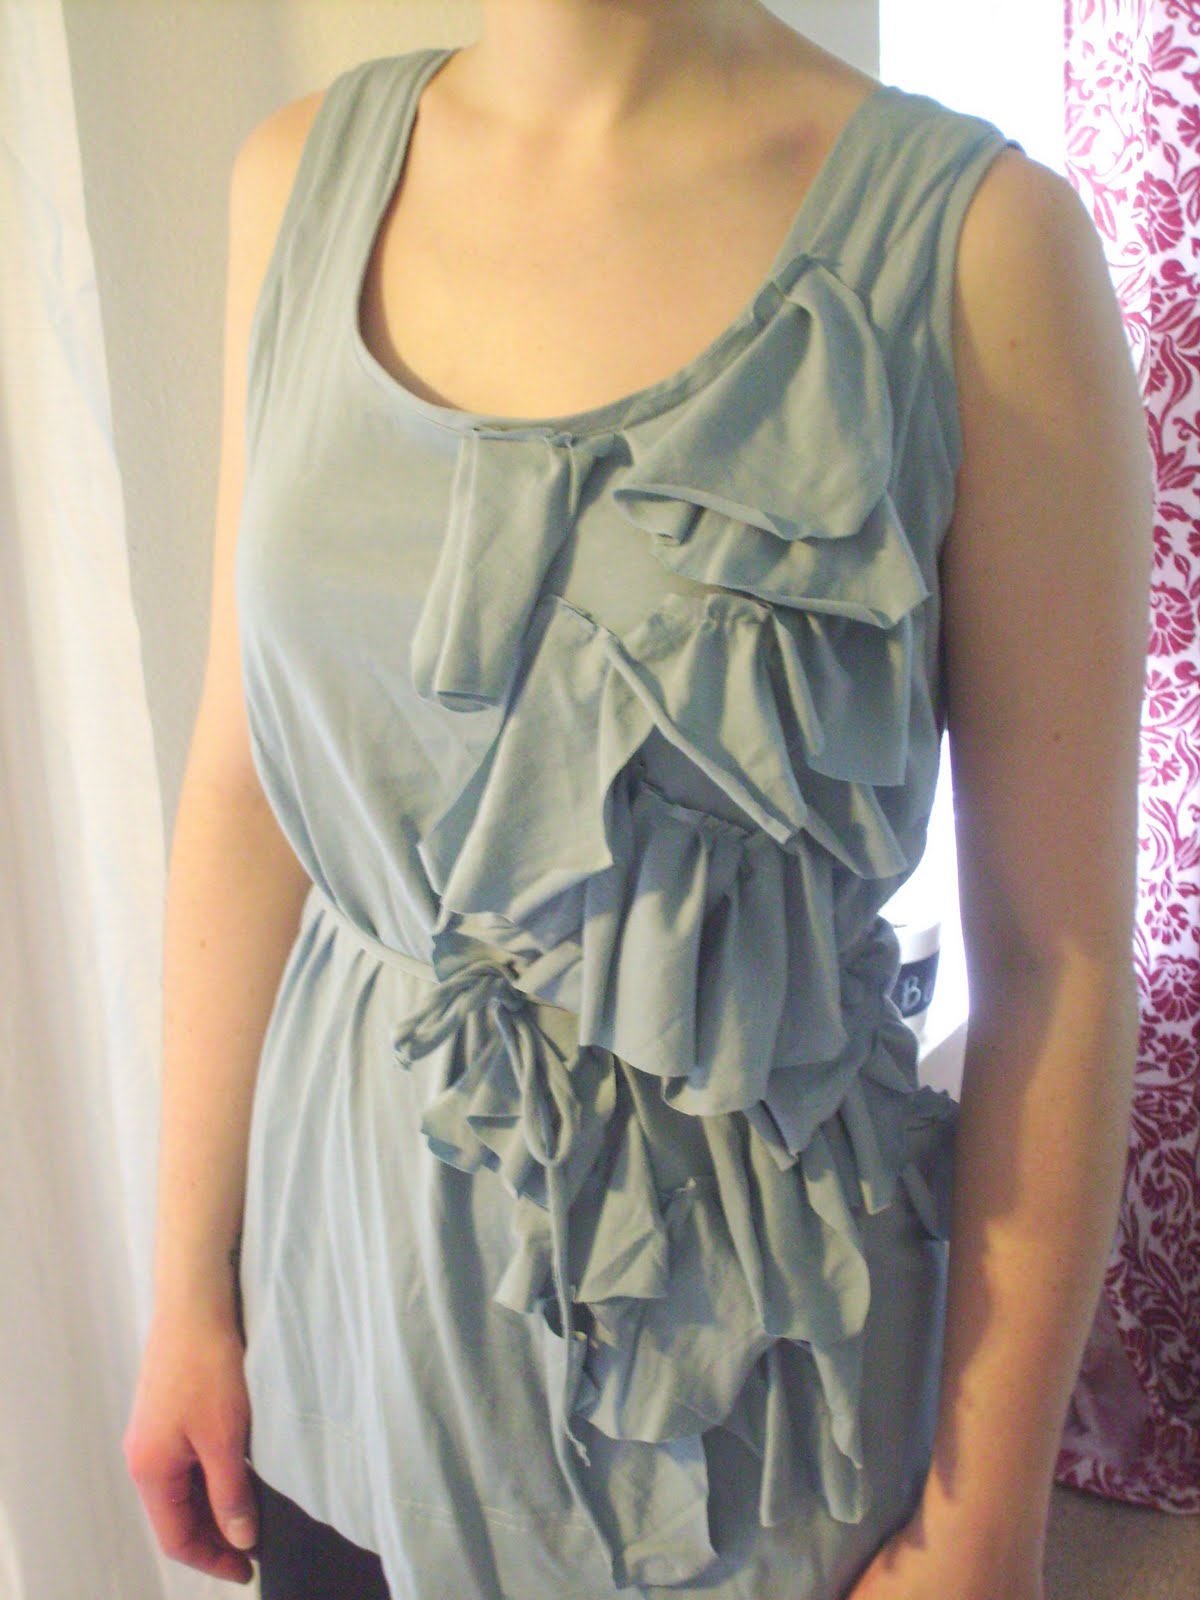
I'm seeing wide strips of bias-cut lightweight knit with little tiny pleats that make them look like ruffles, cascading down the left front of the tank. It's a loose-fitting tank in an equally light knit; I have seen plain tanks like this at Old Navy, etc. but I had a ton of supersoft cotton knit in a soft color that I thought would be perfect. It would probably be easiest to make this tank in a color you know you could match at the fabric store, like black or white--buy a tank for cheap and add your own ruffles--but this tutorial is for the whole shebang, as if you were making it from scratch like I did.
***If you're using a store-bought tank, scroll down to the asterisks for the steps you'll need to follow!***
So here's the tutorial!
- Use a tank of a similar shape to trace your pattern. I'm using a close-fitting one, so I want to make it much bigger through the body. Leave a 1/2-5/8" seam allowance, whichever you prefer, on top of the fit changes.

- Because of the fickleness of knits, I recommend you cut half of the tank, then fold over the cut part to use as your pattern.


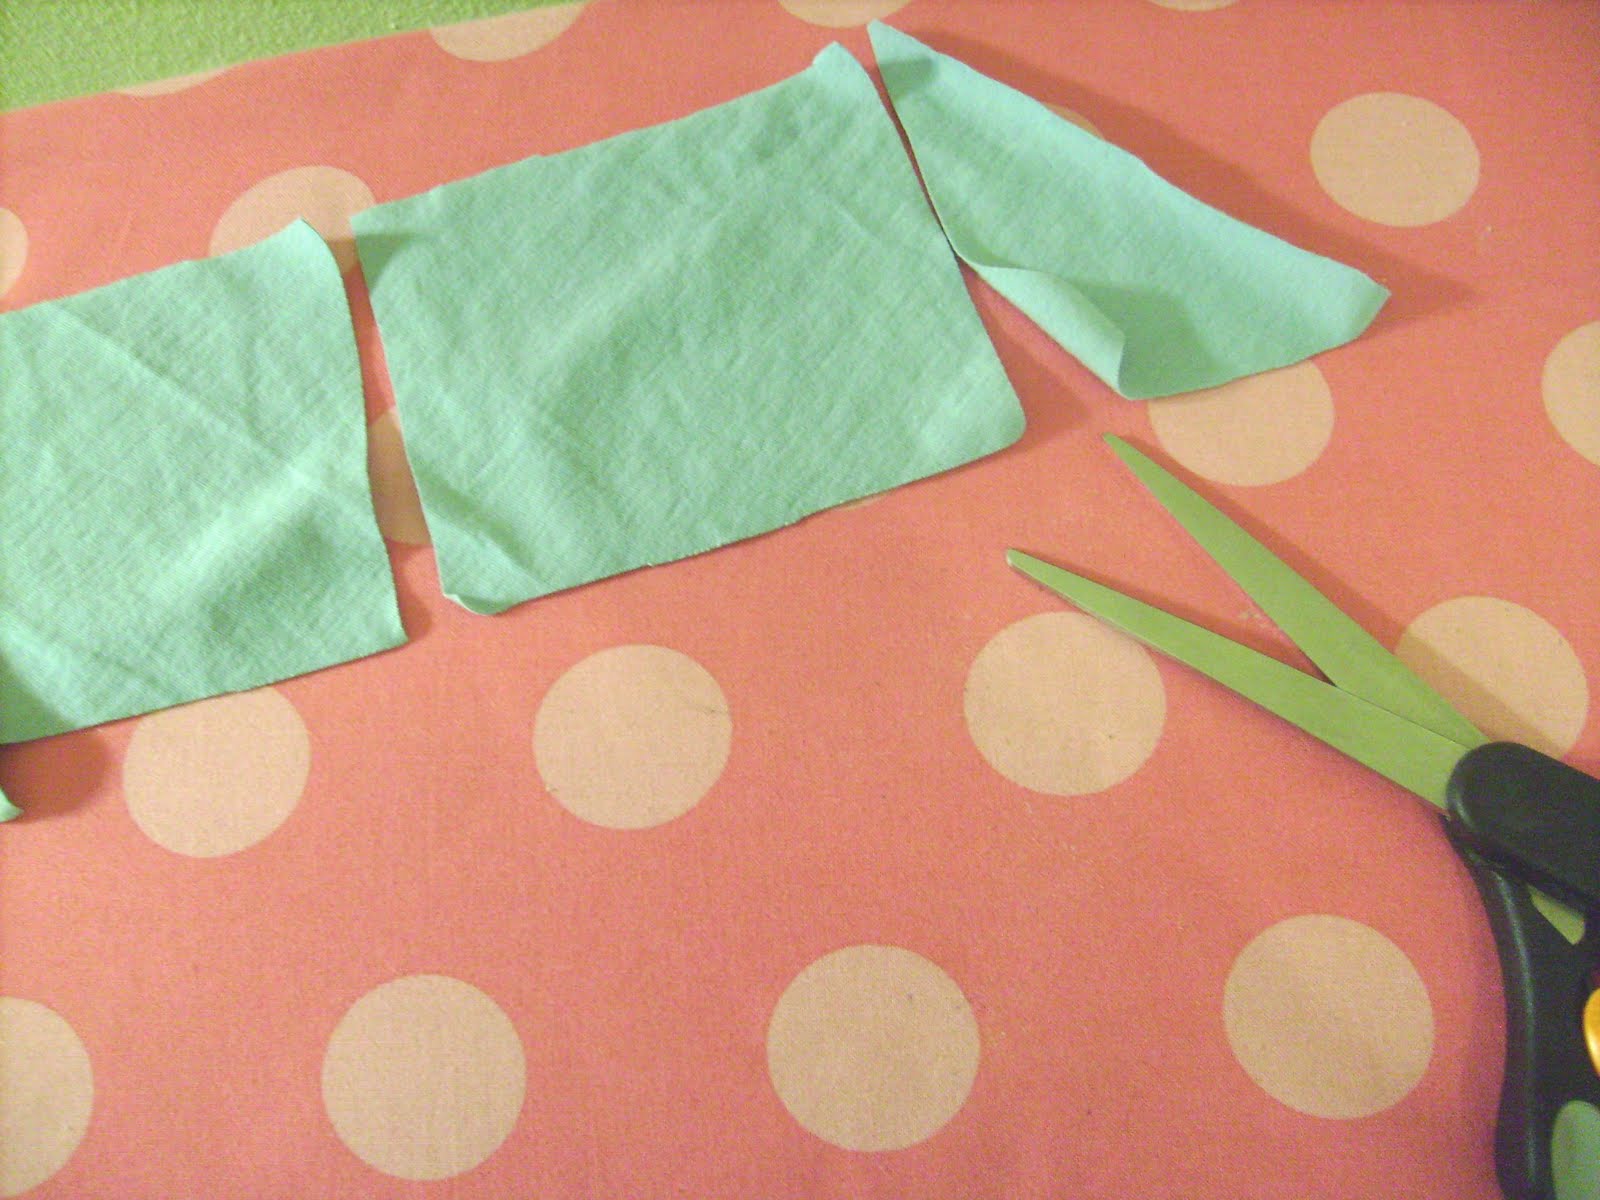
- Cut several wide bias strips (about the width of your hand) and several thinner bias strips, about 1.5" wide.


- Now cut your belt. This is the easiest part--just cut a 1-2" piece on the straight grain and PULL on it--it'll curl up just right!


- Now assemble the tank. You know the drill; sew right sides together along the side seams and shoulder seams. If you have a serger, great, you can serge your seam allowances, but I don't so I did a straight seam and then a zig zag along the raw edges to keep the extra from curling up. Make sure to press your seams to one side.

- There are a few different options for finishing the neck and armhole edges, but I'm going to copy the J.Crew version as closely as I feel comfortable and give it a self-fabric edge (theirs is on the straight grain, I think, but I don't want to deal with all the curling so I'm using bias). If you're doing it the way I did it, sew all your thin bias strips together, right sides together, and press those seams open.
- Press your looooong, thin bias strip in half so the right side is the outside.

- Sew your bias to your tank neck and armholes right sides together. Give a teeeeeny bit extra tension on the bias so it pulls upward and inward.

- Press the curves the right way, then you can zig zag or serge these edges when you're done, too, then press flat again.


- Hem the tank to the length you want. I gave mine a big hem and I like to go along the hem twice to give it the store-bought look of the industrial machines.

***Now for the fun part! The ruffles! Start here if you're using a store-bought tank!***
- Cut your bias strips into sort of rectangles. Do the same pull thing so that the edges (only two edges) curl toward the right side of the fabric. Play around with it!

- Now pin your ruffles on. I used my close-up shot of the lavender J.Crew tank as a guide and just sort of went for it! I looked at the placement, spacing, and ruffled-ness of the example and tried to copy, but after the first few random "rows" it wasn't necessary, and I just put them where they looked good. Do note that these aren't really ruffles--no need to tighten your tension and run a long straight stitch through, then gather. Just use pins to make little tiny tucks and sew down. (This is one of those times where you might think about using iron-on interfacing on the inside to help the tank support itself, and I recommend it if your tank has any spandex or lycra in it, but mine is all cotton and is holding its shape nicely).

- Notice that some of the ruffles on the J.Crew one have about a 1/4" seam, whereas some are at more like 3/8". Play around with it and get the look you want.
- Belt it when you wear it. You can choose to sew the belt down at the sides, but I didn't. Woo hoo!

Whee, this was a fun project!
Wow this tutorial is incredible! I saw this tank a while back and loved it. Yours looks fab!
ReplyDeleteVery nice copy of the original
ReplyDeleteIt looks gorgeous! Would this be a good project for a beginner? I'm a bit scared of knits...
ReplyDeleteI love your work! You have the best tutorials - I get so excited whenever I see you've posted a new one!
ReplyDeletethanks so much for this tutorial. the top is super cute! I will have to take a closer look at it this weekend :)
ReplyDeleteI need some new summer tops yet am $ strapped, so into my drawer to redo what I have. I love you!
ReplyDeleteFabulous!!
ReplyDeleteHi Suzannah, You are even improving your tecnique, I think you are doing a great job. Many compliments, You know I am fond of your tutorial about Jcrew and Anthropologie. Many many compliments and thanks for sharing.
ReplyDeleteCiao
Elena
superb tutorial! i'm in love with this top.
ReplyDeletexo Alison
Fantastic!!! Thanks for posting this tutorial, I love anything to do with J. Crew, specially knits :)
ReplyDeleteOoooo I might have to try this with one of Gwyns old t-shirts! Good tutorial!
ReplyDeleteThanks so much for the tutorial... it is wonderful and I am excited to try it!
ReplyDeleteI am not new to your blog but this is the first time I have posted.
I am a quilter, mainly, but lately have gotten more into clothing and other fun fabric projects... *love* the new direction I've taken... and your blog has been a main source of inspiration. I totally need to email you a pic of the fabric and pattern I picked up last weekend planning to make a dress for a couple of weekends from now... yippee! Thanks for the inspiriation...!
Erin
erin-quilter.blogspot.com
Thanks so much, folks!
ReplyDeleteJaimielee, I think a beginner could do this project but I don't recommend sewing the tank from scratch. Sewing on knits suuucks in my opinion and I avoid it most of the time, unless it's just doing little things like embellishing. Good luck!
I love to see how things turn out!
Wow this is so great! Looks like the original!
ReplyDeleteSo cool! You are really awesome at figuring out how to make these knock-offs!
ReplyDeletewow, you have such talent!!
ReplyDeletewow. that came out great! thanks for the how to!
ReplyDeleteBeautiful!
ReplyDeleteKathy
BEAUTIFUL!
ReplyDeleteI'm soooo going to try this! Love it.
ReplyDeleteGreat Job! Knits can be tricky- but you seem to have a real knack for working with them! My hat's off to ya!! :)
ReplyDeleteAMAZING!!!! I'm a newbie when it comes to sewing!! I'm definitely bookmarking this & I plan to try it once I get the hang of my sewing machine!!
ReplyDeleteLove your blog! I recently did this top too in lilac. ~HLT
ReplyDeleteThanks for the advice! Haha, you just saved me a miserable Saturday. Now I need to go find some shirts I can cut up :)
ReplyDeleteI love your finished product! Thanks for sharing. J crew has a lot of amazing and fun tees and shirts for inspiration. :)
ReplyDeletelove it! i need to make this!
ReplyDelete