WELCOME

Hello! I'm Suzannah, a serious DIYer and mom of two little ones. Follow along with my DIY fixer upper house renovations, sewing and crafty projects, real food recipes, and de-stressing goals.
I believe you can love your home just the way it is, AND have the power to design and make big changes to make it better.
I'm also the author of DIY Wardrobe Makeovers!

3.31.2010

Great new sponsor! Gussy

Have you heard of Gussy?  I imagine some of you have; it's the brand of darling ruffled bags and other goodies by Maggie Whitley, aka Gussy, and they're my new sponsor!
Maggie has a shop and a blog, and here are some of my favorite goodies from the shop:
How cute are those blankets?
And here's a custom bag she made to hold knitting things, with special pockets for needles and everything!
Hope you can check by the Gussy shop and see all the goodies!
4 comments

3.30.2010

Super cool embellished tee tutorial on U create!

The fabulous Kari from U create is hosting a featured tutorial from Adventures in Dressmaking today, hope you get a chance to check it out!!
I'm so honored to be one of her featured guest bloggers.  I did a fun and very, very easy tutorial (no sewing machine needed!) for this cute tee:

Check it out!

3 comments

3.29.2010

"We need to learn to make these shorts!" tutorial

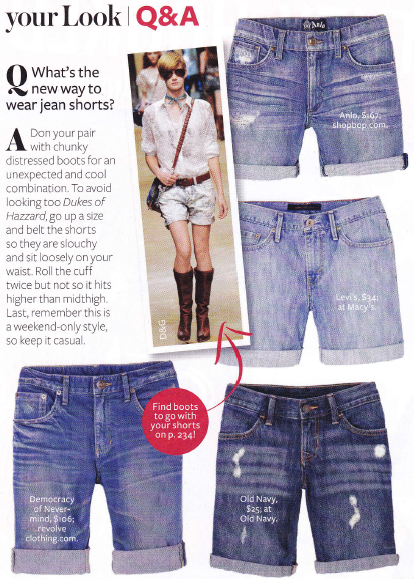
You know the shorts I'm talking about.  I've seen them in every April magazine issue I've received recently--InStyle, Lucky, People StyleWatch, Cosmo (ick), and Glamour.  Here's a page from my InStyle with quite a few choices to get the look, prices ranging from $25-$167.  I've seen them at Target even., not too expensive, but it's much more eco-friendly to make some out of jeans from your closet!  I like that they're cute and trendy but not short-shorts, not too snug, and not the kind that you have to keep tugging down your inner thighs.

Of course we need to learn to make these ourselves!!I set out to make a pair and have written up a tutorial for you.  Here's how to make some longish denim shorts yourself!
  • Start with a pair of loose-ish jeans--snug ones would work, but the look is a little bit softer.  I think jeans with or without stretch would work, but mine are 100% cotton.  Suuuuper old Abercrombie ones, from Goodwill Outlet, the holes are kind of beyond mend-able.
  • Figure out how long you want your jean shorts to be.  I wanted mine about 12" from the center of the inseam, including a 2" cuff.
Cut!  Leave a 1/2" seam allowance, so 12.5" from the crotch.
  • Now, you can't just fold the jeans back and cuff them, like you do rolling up jeans to capri them.  They taper as they go down the thigh, so they're several inches smaller in circumference as you get closer to the knee.  It would not work to just fold it back.  So, take the flared part of the jeans and flip them around 180.  Find the part that's the same circumference as the end of the jeans.
 I want the cuff to be 2", so there will be a 1/2" seam allowance on the top and bottom--cut a 3" piece.
  • Turn the cuff piece back 180 again.  The shape will be like an hourglass, and you'll be switching the inseam and outside leg seams.  See the topstitched side is on top on the cuff piece, but on the inseam on the main piece?
  • Flip the cuff piece inside out inside the main piece, and pin.
  • Sew with a 1/2" seam allowance.
  • Press under 1/2" hem.
  • Press the seam allowance from the two pieces toward the top of your jeans.
  • Fold the cuff piece back and press so that the seam is just under the center of the fold, hidden by like 1/8".
  • Hand-sew the hem down using a hidden whip-stitch, all around on both legs.  I used minimal pinning to keep the 1/2" turn under in place.
  • That's it!!
Hope you got that.  The whole process is more complicated than just turning under a hem, but trust me, it works soooo much better.  Now you can have comfy, non-scandalous, cute jean shorts--from jeans you were thinking about throwing away!  This is one spring trend I am totally into, and I hope you all are too.
Happy recycling!

20 comments

3.27.2010

Out of the mending pile

Just a simple alteration... pulled this tank out of my mending pile today.  It's a cute Roxy tank that I got at Goodwill pretty much brand new.  It was way too big for me but has smocking in the back so it "fits" okay, but it was super long and I didn't really understand why... is it a dress?  A swimsuit cover-up?  A looooong tank?  Anyway, I didn't like that and I also didn't love the twill tape straps.  I get the nautical theme, but... eh.  I liked the bold navy and white print, though!
Kind of disproportionate to the small triangle top-esque bodice part.  So I cut off the bottom... 6" or 7" and used the outer fabric to make straps!  I hemmed the lining and top separately, as they were before... I didn't have the fancy overlock stuff so I just did your basic turn-under-twice hem.
I think the normal length and wider straps work better, although I do think the little bust part is sort of too small to be flattering.  I'm excited for navy and white this season!  Fun nautical looks.

5 comments

3.26.2010

Vintage tablecloth pillow covers

I love cute vintage tablecloths, you know, the cute print floral and fruit ones?  I have quite a few, since I sort of collect them at the Goodwill Outlet, but often they have stains or something on them... such was the case with one that I had that I turned into pillow covers!

It was perfect, since the tablecloth was about 40" square, which meant that I could use each corner and make two matching pillows, not using the center (stained) part!!  How perfect!

After I made them, of course, I realized that they don't actually go with my couch.  I may not use them for a while, but it's nice to know I have them.  And they are soooo cute.  I think they would go so well in a bench in a breakfast nook or dining room window seat, since they are clearly made of a tablecloth.  I put them outside for this pic (it's embarrassing how bad they look on the couch.) ;)

You may remember this tablecloth from this picture...
I pulled out a bunch of things to potentially make into other things, I was thinking bright couch pillows.  None of the other stuff in this pile has been too useful yet.  I'll keep you posted.
9 comments

3.25.2010

Productivity problems? Just cut!

I sometimes have productivity lulls, when I have sooo many great ideas and no clue where to start.  I had this problem recently, so I got out all my fabric and tees and sweaters to make over, and just... started cutting!
I cut things up based on the general idea I had for them.  It's generally not a good idea to start a bunch of stuff and not finish it, but I was getting to the point where I was afraid I'd forget what my brilliant plan had been by the time I got to a project!  So I got everything together and cut out like, five projects!  Now it's that much easier to do them... I don't have to do the back-and-forth between cutting table and sewing machine, anyway!
Here's my mending/crafting pile on the floor in the sewing room closet, a few days ago...
And here's the pile of things to cut on the cutting table...
You will see pics of the end result once I get some more sewing done, I promise!
Do any of you have tips for productivity?  I would loooove to hear them.  I have been so busy recently, but I still have all these ideas of things to do!
6 comments

3.24.2010

No ruffles this time

I did a tee makeover today with a technique other than ruffling--I think this is worth talking about!  I love ruffles but sometimes you just want something simple.  So here's a super simple tee makeover that I did (you'll probably think at first glance, wait, what did you do to it?) that makes this tee a little more interesting and embellished without girly, statement ruffles.
I started with this tee:
And cut off the sleeves.  I cut open the sleeve pieces into strips to decorate the tee with, and then I finished the short sleeve edges using this technique from Make It and Love It.
I did the same thing on the hem, with sleeve pieces, just for fun, and on the neckline but with several layers.  It came out pretty interesting but not girly or froofy:
Simple, casual, but fun.  It was a fun project!

6 comments

3.23.2010

Giveaway!! And a great new sponsor!

THIS GIVEAWAY IS CLOSED =(
Check back, can't wait to do another one!
~~~~~
Folks, I am sooo excited to announce my first giveaway!
I'm also very proud to announce my newest sponsor, Fat Quarter Shop--this great online fabric boutique has a huge selection of very cute fabrics and goodies!!  Gazillions of cute fabric, quilting and otherwise, in so many beautiful prints--it was so hard to pick some out to share with you, so this is just a teeny tiny (almost random) sample of the lovelies they have!  Look at this great stuff!
The GIVEAWAY from Fat Quarter Shop is very exciting--they're generously giving away a layer cake to one lucky reader!  Their layer cakes are collections of 10"x10" squares, all cutely coordinated... a great size to cut up into quilt squares, but big enough to be a very cute patchwork garment or accessory... bags, of course, and my fave, pillows!!!
Here are just some of the super cute layer cakes you will be able to choose from:
Which one will you choose?!?!
This giveaway is open to entries through the end of the day Sunday, March 28th when I will pick a winner at random!
Two ways to enter:
Leave a comment on this post,
and/or share this giveaway: Facebook, Twitter, your blog--leave a link in a comment on this post!
You get one entry per comment, so if you share this in two or three places, make sure to leave two or three comments!
I will announce the winner Monday, March 29th...
Have fun!
226 comments

Search

© Create / Enjoy • Theme by Maira G.