

Modern bathroom renovation REVEAL: The finished One Room Challenge!
The past 6 weeks I've been working on (well, my clients/friends have been doing most of the work on) a complete bathroom renovation! New flooring, new shower tile, new electrical and lighting, turning this pink and red 1960's bathroom into a dreamy modern space!
This was a BIG project with several hiccups and lessons along the way, so I am extra proud and excited to reveal it today!
Remember, you can find all the posts about this One Room Challenge here:
 EVERYTHING in this room got an update! We replaced everything except the tub, which we had resurfaced in white, and most of the drywall which we patched and repainted. New floor tile (even new subfloor under it), new vanity, new lighting, hardware, and other accents.
This project was for my good friends/"clients"--I consulted on design, sourcing, and DIYing, but they did most of the hard labor and dictated the design. (They also hired a contractor to replace and resize the window and plumb and tile the shower, and move the electrical.) Their home was built in 1961 and while we think of that as an era of MCM brass and black, in the case of this small house in North Portland it meant pastel pink plumbing and flower-shaped vanity knobs. Gabriela and Matt love midcentury modern-inspired spaces including many of their inspiration bathrooms, but I wanted to make this room feel unique and fresh too!
Since I published this post with the before photos, they have also shared with me the listing photos--they've owned this home less than 2 years and planned to tackle the bathroom and kitchen pretty soon, so all they did when they moved in was paint the walls & vanity and clean it up. So here you can see listing photo, move-in day, and how they lived with it while waiting for this reno.
(This listing photo... the whole house was like that! Multiple paint colors in one room, colorful but non-matching decor... white paint is magic and they have already transformed the rest of the house! Oh, and that red vinyl floor was only a few years old, put in by the previous owners with that love of mismatched color.)


Then... and now!!!


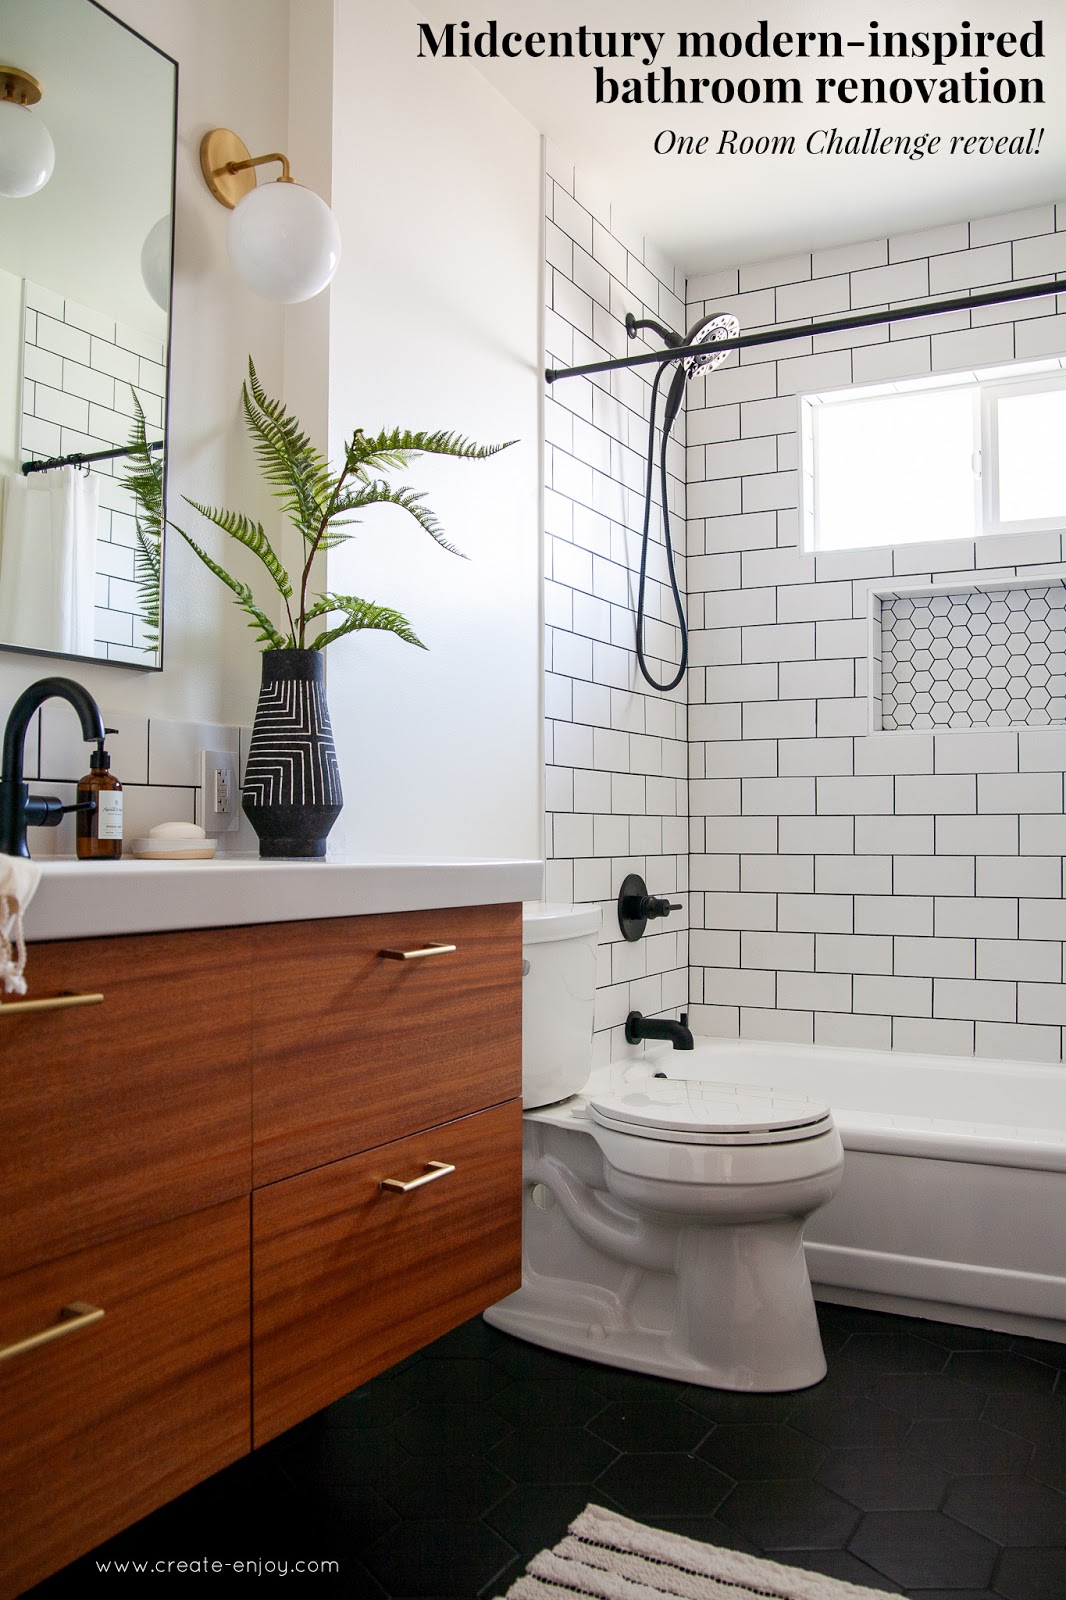
Some stars of the show... that rich wood vanity! That's an IKEA Godmorgon vanity base with Semihandmade drawer fronts in the Mahogany color. We debated and debated over the color/wood to choose for the fronts and I think Mahogany was so perfect. It even almost matches the door and trim of the room and rest of the home. Very 1961-appropriate, apparently!


We went with black plumbing fixtures because my clients didn't like the Champagne Bronze you often see in modern fixtures, a Delta color, and couldn't find others they liked in their budget. So we went with black and mixed metals with gorgeous brass lighting from Hudson Valley Lighting/Mitzi, and brass drawer pulls. Aren't those sconces fabulous?!?! They are the Stella style, and we love that they also have a semi-flush mount overhead light to coordinate. Sometimes sconces are enough in a bathroom for lighting and accent, but this room needed more light over the shower and the Stella semi-flush mount is SO cute and perfect here!


I also LOVE the mirror over the vanity. I don't think you can tell from the pictures, but it is MASSIVE! It's this one from CB2, great price for this size and sleek modern look. I think I might want one for my bathroom reno later this year...


So let's talk styling. I had to add an amber soap bottle, some tall greenery (I think we should have thought about art above the toilet, but I found that placing this huge vase on the right side of the vanity helped balance that area out), and the prettiest storage canister. I also used this soap dish and a big amber candle. Note that none of these items matches each other exactly--I think the key to an interesting, intentionally decorated-looking bathroom is using pieces that go together but aren't from a mass-produced set. The sets of matching everything can look very dorm-ey even when each piece is fine on its own.
The towel is from here.


You may notice that there's no toilet paper holder, hand towel ring, or towel bar... we went back and forth and in the end my clients chose these simple, not too chunky black ones (towel bar/towel ring/TP holder), but they are still in the mail.
The bath mat is this one and I love it! It looks so much more expensive than it really is. It's actually pretty hard to find a simple striped bath mat that is also absorbent and plush enough!

For flooring and tile... we went with an almost-black large hex tile and off-black grout. Man, those tiles are cool! (See my tutorial on how to lay them HERE.) The shower and backsplash tiles are an oversized, matte subway tile for a way more modern spin on a classic. The hex tile in the shower niche is some I had left over from this bathroom reno! We had the original (pink) cast iron tub resurfaced white by a local place.
Also note the baseboards. They're the same style as the rest of the house's original ones, that gentle arch at the top, but they're taller and we painted them white. They were actually pretty hard to find in real wood (a must for a bathroom, instead of the composite kind). Not an exciting part of the project (one of my least favorite steps, actually, installing baseboards--see my tips here) but one of the details you have to think about when you do a full bathroom reno!

There you have it, top-to-bottom of this full room makeover! It is SO beautiful and so exciting to have a space that matches the rest of my clients' home and is as modern and classy as they are!
Thank you so much to the brands that helped with this project!
Lighting: "Stella" fixtures, provided by Hudson Valley Lighting/Mitzi (sconces/semi-flush mount)
Vanity fronts: Provided by Semihandmade
Additional sources below:
Floor tile: Overstock
Floor grout: Home Depot
Wall/shower tile: Home Depot
Wall/shower grout: Home Depot
Mirror: CB2
Faucet: Delta, from Amazon
Tub faucet: Delta, from Amazon
Shower head: Delta, from Amazon
Vanity hardware: Home Depot
Bath mat: Target
Towels: Amazon
Shower curtain: Amazon
Hooks/towel bar/towel ring/TP holder (not shown/not yet installed): Amazon (same exact ones I used in this bathroom, but they are cheaper now!)
Soaps: Target
Vase: Target
Fern greenery: Target
You can also check out the ORC blog for the rest of the reveals up this week! There are 20 featured designers plus tons of other guests like me!
This was a BIG project with several hiccups and lessons along the way, so I am extra proud and excited to reveal it today!
Remember, you can find all the posts about this One Room Challenge here:
- Week 1: Before and inspiration
- Week 2: Demo! and brass vs. black fixtures
- Week 3: How to lay big hexagon tile tutorial
- Week 4: 5 preventable reasons DIY home projects fall behind
- Week 5: How to get a custom-look vanity for less
- Week 6: The reveal! You're here!
This project was for my good friends/"clients"--I consulted on design, sourcing, and DIYing, but they did most of the hard labor and dictated the design. (They also hired a contractor to replace and resize the window and plumb and tile the shower, and move the electrical.) Their home was built in 1961 and while we think of that as an era of MCM brass and black, in the case of this small house in North Portland it meant pastel pink plumbing and flower-shaped vanity knobs. Gabriela and Matt love midcentury modern-inspired spaces including many of their inspiration bathrooms, but I wanted to make this room feel unique and fresh too!
Since I published this post with the before photos, they have also shared with me the listing photos--they've owned this home less than 2 years and planned to tackle the bathroom and kitchen pretty soon, so all they did when they moved in was paint the walls & vanity and clean it up. So here you can see listing photo, move-in day, and how they lived with it while waiting for this reno.
(This listing photo... the whole house was like that! Multiple paint colors in one room, colorful but non-matching decor... white paint is magic and they have already transformed the rest of the house! Oh, and that red vinyl floor was only a few years old, put in by the previous owners with that love of mismatched color.)


Then... and now!!!


Some stars of the show... that rich wood vanity! That's an IKEA Godmorgon vanity base with Semihandmade drawer fronts in the Mahogany color. We debated and debated over the color/wood to choose for the fronts and I think Mahogany was so perfect. It even almost matches the door and trim of the room and rest of the home. Very 1961-appropriate, apparently!


We went with black plumbing fixtures because my clients didn't like the Champagne Bronze you often see in modern fixtures, a Delta color, and couldn't find others they liked in their budget. So we went with black and mixed metals with gorgeous brass lighting from Hudson Valley Lighting/Mitzi, and brass drawer pulls. Aren't those sconces fabulous?!?! They are the Stella style, and we love that they also have a semi-flush mount overhead light to coordinate. Sometimes sconces are enough in a bathroom for lighting and accent, but this room needed more light over the shower and the Stella semi-flush mount is SO cute and perfect here!


I also LOVE the mirror over the vanity. I don't think you can tell from the pictures, but it is MASSIVE! It's this one from CB2, great price for this size and sleek modern look. I think I might want one for my bathroom reno later this year...


So let's talk styling. I had to add an amber soap bottle, some tall greenery (I think we should have thought about art above the toilet, but I found that placing this huge vase on the right side of the vanity helped balance that area out), and the prettiest storage canister. I also used this soap dish and a big amber candle. Note that none of these items matches each other exactly--I think the key to an interesting, intentionally decorated-looking bathroom is using pieces that go together but aren't from a mass-produced set. The sets of matching everything can look very dorm-ey even when each piece is fine on its own.
The towel is from here.


You may notice that there's no toilet paper holder, hand towel ring, or towel bar... we went back and forth and in the end my clients chose these simple, not too chunky black ones (towel bar/towel ring/TP holder), but they are still in the mail.

For flooring and tile... we went with an almost-black large hex tile and off-black grout. Man, those tiles are cool! (See my tutorial on how to lay them HERE.) The shower and backsplash tiles are an oversized, matte subway tile for a way more modern spin on a classic. The hex tile in the shower niche is some I had left over from this bathroom reno! We had the original (pink) cast iron tub resurfaced white by a local place.
Also note the baseboards. They're the same style as the rest of the house's original ones, that gentle arch at the top, but they're taller and we painted them white. They were actually pretty hard to find in real wood (a must for a bathroom, instead of the composite kind). Not an exciting part of the project (one of my least favorite steps, actually, installing baseboards--see my tips here) but one of the details you have to think about when you do a full bathroom reno!

I hope you enjoyed reading this post and following along! You can find all the posts about this One Room Challenge here:
Thank you so much to the brands that helped with this project!
Lighting: "Stella" fixtures, provided by Hudson Valley Lighting/Mitzi (sconces/semi-flush mount)
Vanity fronts: Provided by Semihandmade
Additional sources below:
Floor tile: Overstock
Floor grout: Home Depot
Wall/shower tile: Home Depot
Wall/shower grout: Home Depot
Mirror: CB2
Faucet: Delta, from Amazon
Tub faucet: Delta, from Amazon
Shower head: Delta, from Amazon
Vanity hardware: Home Depot
Bath mat: Target
Towels: Amazon
Shower curtain: Amazon
Hooks/towel bar/towel ring/TP holder (not shown/not yet installed): Amazon (same exact ones I used in this bathroom, but they are cheaper now!)
Soaps: Target
Vase: Target
Fern greenery: Target
You can also check out the ORC blog for the rest of the reveals up this week! There are 20 featured designers plus tons of other guests like me!


No comments
Post a Comment